Elodea is a genus of aquatic plant known to be a fine oxygenator for ponds and aquariums. Elodea in the Greek literally means marshy. Also known as waterweeds (American or Canadian) or water weed, Elodea is native to North America and is found in ponds and slow streams. The only place it is not found is in the extreme northern parts of the continent. It has also been introduced to many other parts of the world.
Some species of Elodea, introduced in England in 1841, clogged up canals and waterways. It is considered a problem plant in many areas of the world. However, in the United States, the Elodea is considered an excellent plant for use in ponds and aquariums.
Elodea is a slender plant that grows from 4 inches to 3 feet depending on the depth of the water. The American waterweed (Elodea Canadensis) lives entirely underwater except for delicate white pistillate flowers that bloom at the surface and float on the surface of the water. Staminate flowers rise to the surface and release their pollen. The fruit of the Elodea ripens below the surface. Elodea produces heavy buds in the Fall that fall off and drop to the bottom and then begin to grow in the Spring; relying little on seed production.
Geese, ducks, and swans like to eat Elodea plants so don't be surprised if growing it in your pond attracts some of these visitors. Elodea is also an excellent plant for the protection of fish fry. Gold fish will lay their eggs so that they attach to the stalks and the fry use the stalks for cover.
Elodea can tolerate a wide range of temperatures, PH levels, and growth mediums. Before introducing new plants, it might be wise to keep them in quarantine or run the plants through a plant dip/bath to rid them of unwanted snails or algae. If you want a hardy, low-maintenance oxygenator plant for your pond, the Elodea is an excellent choice.
Photographing pets can often be a difficult proposition. Add water, glass reflections and the low lighting of an aquarium environment, and you've got the recipe for one extremely difficult photo shoot.
But it doesn't have to be that hard. Armed with the following tips, you can get great photos of your fish in just about any situation.
1: Get a tripod.
Tripods are usually used for non-moving subjects. But they can be immensely helpful when photographing fish, even ones that are constantly moving. Low light levels lead to slow shutter speeds. So anything you can do to stabilize the camera will be of tremendous help. The best way to photograph moving fish with your camera on a tripod is to loosen the levers on the tripod so you can move the camera freely left, right, up and down but the camera will remain in position if left alone.
2: Get your fish acquainted with the camera.
Now that you have a tripod (since you faithfully followed the first tip), set it up in front of your aquarium with the camera mounted on the tripod. Now leave it. For as long as possible... several days would be ideal. The purpose of this exercise is to get the fish used to see the "thing" you're constantly moving around, pointing it at them and making noises. When they're comfortable with the sight of the camera, they'll be more relaxed and less prone to dart around the tank or hide.
3: Use a digital camera.
Digital cameras allow us to "just take the picture" without worrying about whether we're wasting the film and processing money on a shot that won't be good. When you can focus on getting the best shot possible, no matter how many tries it takes, you're on the right track to get the shot you want.
4: Turn off the lights in the room.
Ambient light causes reflections on the tank glass that may ruin a perfectly good fish photograph. Eliminate all sources of ambient light that you can, and be very aware of any reflections as you shoot. If there are some reflections you can't get rid of, try putting your body between the light source and the glass to shield the tank from the light.
5: Clean the glass, cut the pumps.
Turning off the aquarium pumps before you shoot is an excellent way to clean up your shots of particles and bubbles in the water column. and if you happen to have a planted freshwater tank or reef aquarium, this will also prevent the plants or corals from swaying in your picture, turning into a blurry mess.
Cleaning the glass is probably the most overlooked step to aquarium photography, and quite possible is responsible for more ruined photos than any other issue. Remember, just because you don't see it now, doesn't mean you won't see it in the picture. Amazing how that happens. So clean the glass well, every time, before you pick up the camera.
6: A Bonus!
Have fun. Aquarium photography can become an interesting and challenging hobby all its own. Have fun with it, experiment freely, and be sure to share your pictures online!
Basically, African cichlid aquarium is best decorated by making a simulation of its natural habitat in the wild as possible. This is so to make cichlids comfortable and secure.
Therefore, when setting up the tank the question should be what makes an African cichlid feel comfortable and secure when it comes to their environment? They like to live in a habitat that has lots of hiding place as a refuge area for smaller fishes as well as for territorial purposes for the bigger species.
The first rational thing to do is to read books, searched online for information about its natural habitat and then when sufficient info's has been gathered start planning out the materials to be used.
Basically, Lake Malawi is sandy in some areas thus a crushed coral or sand substrate is adequate. Crushed coral help raise the pH in the aquarium water. If sand is preferred, I suggest the use of Tropical Play Sand. Whichever substrate is chosen, make sure that they are properly washed before placing in the tank.
Now, what rocks are appropriate for your African cichlid aquarium? Tufa rock may be used it is also known as a saltwater base rock but if honeycomb rock is available this is a much better choice. Honeycombed rocks consist lots of holes and tunnels which smaller fish can use for hiding. Once the rocks are bought, make sure to anchor it safely and sturdy in its place that will not be easily moved by the agility and aggressiveness of African cichlids.
The last step in aquascaping your tank is to purchased plastic or real plants. Your choice will greatly depend on the keeper. If time is not possible it is best to pick plastic plants since live plants require constant care not only that cichlids like to nibble on live plants. However, if live plants are dearly preferred an Amazon sword is a good idea and matched it with maybe a couple of fake plants. That should do the trick. Plants can add color and beauty to the aquarium as well as a hideaway for cichlids. Place the plants in bunches or clumps it would look more natural and useful too. If fake plants are used buy only the natural colors like green. Avoid using colorful ones like blue or yellow, although they come in nice colors they do not mimic the natural habitat of an African cichlid.
Here's a few list of other materials that might be useful:
1.Driftwood - this would look natural and lowers pH.
2.Shale, flag stone, slate - these are good for forest and rift lake cichlids. Very good as caves and over hangs but are not natural for Lake Malawi cichlids.
3.Small shells - good for shelter and spawning and may increase pH level.
4.Clay pots - Not natural for Lake Malawi but are great for spawning and shelter.
There are many decorations that may be used for African cichlid aquarium just bear in mind to create the environment with natural effects as to where your particular cichlid originates.
Lacey Bryant is a cichlid enthusiast and author, who has been caring for cichlids for over 20 years. It is her goal to see that all Cichlids are properly cared for. Article Directory: EzineArticles
The kuhli loach or Pangio kuhli or Acanthophthalmus kuhli are members of the family Cobitidae. They are native to Indonesia. They can be found in Singapore, Malaysia, Borneo, and Java.
Kuhli loaches have elongated eel-like, scale-less bodies. They commonly have alternating light and dark color bands circling the length of their bodies. The combination of shape and color bands make them resemble a snake more than a fish. They slither along the bottom of an aquarium much like a snake or an eel would. They are definitely one of the more interesting additions you can make to your aquarium.
The Kuhli loach is a bottom dwelling scavenger fish. Scavenger fish can always be distinguished from other fish by their downward facing mouth with the protruding barbles on either side. Barbles are a tentacle-like organ that contains taste buds. They serve the dual purpose of helping the scavenger find food and to help him feel his way along the bottom of a riverbed in murky water or at night.
Kuhli loaches are nocturnal. They scavenge at night and spend most of their day hiding under plants and rocks. They are also borrowers. They often burrow into the substrate to hide or rest. Sand works best if you are planning on raising kuhli loaches. You definitely want rounded gravel if sand for some reason is not an option. Sharp edges can damage their barbels. If you use a gravel siphon to help keep your tank clean remember that kuhli are burrowers. Take a head count. You don't want to injure one.
Kuhli loaches, like all bottom dwellers, make a wise addition to a community tank. Scavengers are mild mannered. And they help keep uneaten food particles from creating harmful bacteriological build up in the water. Kuhlis take readily to heavily planted tanks and have an affinity toward aquarium decorations with openings. They seem to take comfort in knowing there is a cave to retreat to. It also makes a great place for them to hang out in during the day.
Kuhlis are highly social creatures. They like to congregate with members of their own species. Purchasing a single Kuhli for your tank would not only be an injustice to the animal, it would also deprive you as an aquarium owner the pleasure of watching them function as a group.
Kuhlis are rather tolerant of their surrounding. They prefer slightly acidic water (pH 6.7-7.0) with a temperature range between 75-86°F. Kuhlis grow to 3-4 inches as adults and can live up to 10 years. Females have fuller bodies than the males.
Kuhlis are omnivores. They should be fed at night with the aquarium lights off. Sinking wafers or heavier food matter will ensure they get plenty to eat.
The Kuhli is egg layers. But they rarely take spawning in captivity. No one seems to know what conditions are most likely to induce a kuhli to spawn. Having a group of kuhli with an abundance of hiding places tends to help them feel comfortable enough with their surroundings to reproduce. Kuhli loaches have been reported to breed underneath under gravel filters.
The latest trend among Saltwater Tank enthusiasts is raising pet jellyfish. Jellyfish need specially designed Jellyfish Fish Tank Aquariums. Jellyfish tanks are easier to maintain than traditional saltwater setups. Moon Jellies are the most popular jellyfish among home aquarists both for their exotic beauty and their ease of care. They have become so popular that two US-based websites are now tank raising them to meet the growing demand. Pet Moon Jellyfish look absolutely incredible under a fading LED lighting system.
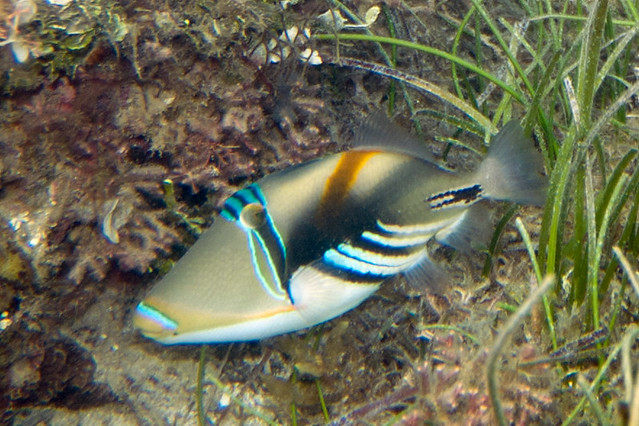
Picasso triggerfish is one of the most commonly sold triggerfish in the marine aquarium trade. Because of this, it is also the most recognizable. Their scientific name is Rhinecanthus Aculeatus and they are also known as the Huma-Huma or Humu-Humu triggerfish. This species is collected around the waters of Fiji and Tahiti.
They are nowhere near as expensive as some uncommon species like the clown triggerfish or the expensive crosshatch triggerfish. They range anywhere from $30-$40 depending on the size of the specimen.
They are called the Picasso triggerfish because of the presence of a variety of colored lines across its body. Red, yellow, blue and white lines adorn its face, mouth and the main section of its body. They can attain a length of twelve inches and require larger aquariums with a minimum of 100 gallons because of this.
Like all triggerfish, the Picasso triggerfish has a huge head. Viewed from the side, it makes up to one-third of the total body size. This is a distinctive feature found in all members of the triggerfish family. They are also aggressive and highly territorial and will defend their nesting site against all uninvited guests as many a scuba diver has learned.
In the wild, they primarily hunt for crustaceans that include crabs, shrimp and even invertebrates like the sea urchin. They are able to crack the tough exoskeleton of their prey thanks to their immensely powerful jaws. Because of the strength of their jaws, they can deliver painful bites to their human keepers as well.
Because they are carnivores, we must try to mimic their diet in captivity. Offer them meaty foods like freshly chopped seafood that include fish, shrimp, scallops and such. Mysis shrimp, frozen krill and frozen meat mixes are some good choices as well.
Overall, Picasso triggerfish are very hardy and easy to keep provided it has ample swimming space and always be careful to select tank mates that can hold their own against this large and aggressive species.
Haven’t decided whether to build or buy a saltwater aquarium? For most people buying a ready-made aquarium is by far the easier option. But if you’re handy with tools and construction you might be thinking of building your own tank. This chapter will provide you with do-it-yourself instructions on how to build a 55-gallon glass aquarium to house your marine life. Ultimately it is for you to decide whether you want to build or buy a saltwater aquarium. If you are more comfortable with a bought tank, by all means, get one!
Building a tank from scratch is challenging and not for beginners unless you have plenty of patience and are willing to ask for help. However using the materials list, step-by-step instructions and advice provided here you can build your very own glass aquarium. Whether you build or buy a saltwater aquarium you will find the setup fun and rewarding. However, having built your own special tank is doubly satisfying.
Before you get started you need to know a thing or two about working with glass. The tank you are going to build is 14 inches high with ¼ inch glass panels. If you want to make a bigger saltwater aquarium you will need to learn how to calculate the correct thickness of glass for the size of the tank. If you haven’t decided whether to build or buy a saltwater aquarium you might want to consider how comfortable you are working with glass.
Whether you build or buy a saltwater aquarium, the first thing to do is to draw up a plan or schematic of the kind of saltwater aquarium you want. Make sure that all your measurements are correct so that the tank fits together properly. This aquarium is built with the two end panels fitted inside the back and front panes.
The front, back, and side panels are set on top of the aquarium floor. If you don’t know how to cut glass you can ask the professionals to do it for you. If you build or buy a saltwater aquarium you need to understand how the glass is fitted together as this has a lot to do with the stability of the tank.
Whether you decide to build or buy a saltwater aquarium you will probably be making use of a lighted hood. When you draw up your plans you must include the hood. You should never place a solid glass on the aquarium top as this reduces the gas exchange that occurs at the surface. If this happens your aquarium will not get enough aeration and the health of the tank will suffer.
So what materials will you need to build a saltwater aquarium? Whether you build or buy a saltwater aquarium you will need to purchase all the necessary materials that go into making a good marine setup. To build a 55-gallon aquarium you will need the following:
Whether you choose to build or buy a saltwater aquarium you should choose the biggest one that fits into your home. If your tank is bigger than 30 gallons in size you might want to install a support brace at the tank’s center. Do this by cutting a six-inch wide piece of glass that will fit the outside edges of the front and back panels. Usesilicone to position it in place.
Next, you will prepare the glass panes. Use an emery cloth or silicon carbide sandpaper to smooth the edges of the glass. Clean the glass pane joints and edges at ½ inch inward using acetone. Prepare the duct tape by cutting 16 strips of tape, 5 inches long. Place these nearby. Always be careful when handling glass. This is true whether you build or buy a saltwater aquarium
Place your pieces on the floor or table in the correct order for assembly. If need be, mark them with words or arrows so you don’t lose track. Place the bottom panel on a flat non-scratch surface. Stick 8 pieces of tape to the glass on the bottom side (sticky side up). If you decide to build or buy a saltwater aquarium always take care not to scratch the glass.
Now install the front glass piece. Next fold the two bottom pieces of tape upward and stick them to the glass. Now you are ready to install the first side panel by folding the 2 bottom duct tapes upward and sticking them to the front of the glass. Secure the side piece to the front piece of glass with 2 strips of tape.
Next install the other side piece, and the back panel. Once the tank has been built use silicone to seal the eight joint areas on the inside of the tank. Use a small amount and smooth your thumb over the silicone to level it. Let the tank sit for 24 hours to cure the silicone. It does not matter if you choose to build or buy a saltwater aquarium, it is always vital that it does not leak!
After the resting period, you can fill the tank with fresh water. Let it sit for 12 to 24 hours. Why? You are testing your tank for leaks! A 24 hour testing period is better as it will leave you more confident that your tank is actually watertight. This is important whether you build or buy a saltwater aquarium.
Once you are sure that your tank is fit for your marine world you can set about planning the fish, invertebrates, and plants that will go into your tank. It is not that important whether you choose to build or buy a saltwater aquarium. Most people will probably opt for the ease of walking into a store and choosing a perfect, assembled tank but for those who like a challenge, constructing your own tank can be very satisfying. Once you have set everything up you will feel doubly proud! Enjoy your new aquarium!


 can often be a difficult proposition. Add water, glass reflections and the low lighting of an aquarium environment, and you've got the recipe for one extremely difficult photo shoot.

 is best decorated by making a simulation of its natural habitat in the wild as possible. This is so to make cichlids comfortable and secure.
 ? Tufa rock may be used it is also known as a saltwater base rock but if honeycomb rock is available this is a much better choice. Honeycombed rocks consist lots of holes and tunnels which smaller fish can use for hiding. Once the rocks are bought, make sure to anchor it safely and sturdy in its place that will not be easily moved by the agility and aggressiveness of African cichlids.


 is one of the most commonly sold triggerfish in the marine aquarium trade. Because of this, it is also the most recognizable. Their scientific name is Rhinecanthus Aculeatus and they are also known as the Huma-Huma or Humu-Humu triggerfish. This species is collected around the waters of Fiji and Tahiti.
 , the Picasso triggerfish has a huge head. Viewed from the side, it makes up to one-third of the total body size. This is a distinctive feature found in all members of the triggerfish family. They are also aggressive and highly territorial and will defend their nesting site against all uninvited guests as many a scuba diver has learned.
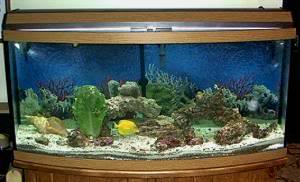

 ? For most people buying a ready-made aquarium is by far the easier option. But if you’re handy with tools and construction you might be thinking of building your own tank. This chapter will provide you with do-it-yourself instructions on how to build a 55-gallon glass aquarium to house your marine life. Ultimately it is for you to decide whether you want to build or buy a saltwater aquarium. If you are more comfortable with a bought tank, by all means, get one!
 to position it in place.