As the ecosystem in nature is very fragile and prone to triggering severe consequences if the balance of elements is altered so is the ecosystem inside of an aquarium a very fragile thing, leading to devastating consequences if the balance is thrown off. Because of this, it is important that the elements of the water be tested on a regular basis and necessary alterations made as frequently as possible.
Photo: Wikipedia (CC)
There are many elements which are important for the well being of your aquarium fish; temperature and pH have the greatest immediate impact on their well being and should be monitored closely. There are certain precursors which can be tested in order to anticipate problems with these elements, and by closely monitoring these precursors an attentive owner can prevent the death of their fish in much the same way that an attentive physician may be able to head off the formation of cancer.
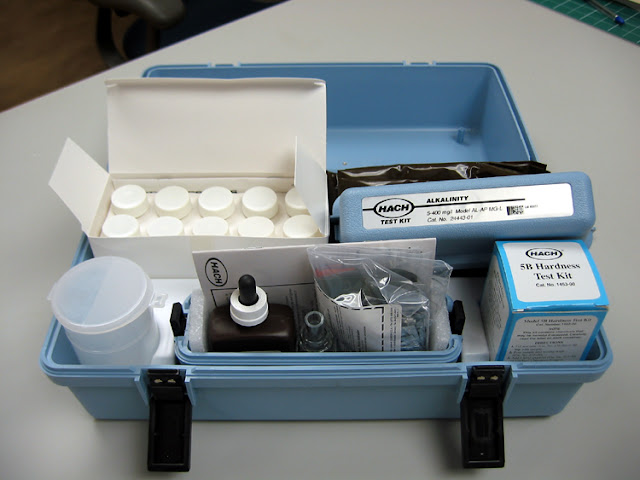
The carbonate hardness, or kh, level of the water should be monitored closely using one of the commercial systems which are available on the market. These can be purchased from any saltwater fish dealer or through an online retailer such as Amazon.com. The hardness of the water is significant because it can lead to rapid swings in pH. These swings can cause the fish to become stressed, making them more vulnerable to disease than they would be otherwise. This means that it will take very little to make them ill; the germs from the fingers of human hands could be enough to cause an epidemic and wipe out your entire aquarium population. Remember what smallpox did to the Indian populations because their immune systems were not prepared? The consequences could be just as fatal.
Fish will generally adapt to the hardness of the local water supply fairly quickly; however, to truly thrive their environment should be as close to that of their natural habitat (i.e. where they would be living if they were not living in a tank in your home) as possible. This is particularly necessary if you are entertaining the notion of breeding your fish-bear in mind that much like human newborns baby fish will not have had a chance to adapt to an environment that was not suited for them, and many may die because of this. Organic water plants will also thrive best in water that closely resembles their natural habitat. There are many commercial products available which will help to soften the water if the kh level is too high.
By carefully monitoring the kh levels of your aquarium you will be able to stay one step ahead of the elements and help to ensure that your fish have the best chance of survival possible.
Technology, the result of creative innovations, constantly changes our lives. Each technological advancement increases the significance of our choices. Conventional products now compete with new and improved varieties. Versatility, design, and product enhancements provide consumers with more choices than ever. Hobbyists are taking note. For example, advancements in aquarium production now expand beyond the traditional glass structure, opening a whole new world to aquarium enthusiasts.
A diver cleaning acrylic at the Georgia Aquarium. (Photo credit: Wikipedia)
Traditionally glass tanks were manufactured using silicon sealant. Due to construction constraints sizeable aquariums were generally rectangular. Size and shape variations are difficult to achieve with glass panels. Cracking and leakage concerns hampered customization of glass aquariums also. However glass was the original material for a reason, it was the best available choice.
Nowadays acrylic is pushing glass out of the lead, at least where aquarium enthusiasts are concerned. Simply put consumers demand versatility, acrylic offers versatility and more that glass never could.
Better leak protection, greater strength, superior insulation, lighter weight and incredible pliability prove acrylic is a more advanced material. These strengths allow personalization, customization, and endless possibilities for consumers wishing to add an aquatic factor.
The differences are undeniable, glass tanks require a silicon sealant while acrylic aquariums are molecularly welded. Sealant can age and crack over time, but welding fuses the seams creating a virtually leak-proof barrier. It'll be a long time before technological advancements allow that kind of leak protection from glass.
Acrylic is also seventeen times stronger than glass and it's more flexible. Strength is important for preservation, protection and impact resistance. Flexibility dramatically increases design versatility. Unlike glass, acrylics can be manipulated into various shapes. For example, acrylic aquariums can have flawlessly rounded corners glass aquariums cannot.
Additionally acrylic aquariums are 20% better insulated than glass aquariums. Thus acrylic aquariums require less energy for maintenance. Enhanced insulation regulates temperatures making equilibrium easier to achieve for a variety of fish and plant life.
Perhaps consumers are wondering if transparency is affected by the increased insulation and strength of acrylic. All these benefits would not be worth a hazy view. Actually, transparency has not been compromised. Acrylic aquariums boast a 93% transparency rating, which is as clear as optical glass. Acrylics reportedly pass the most light of any known material; glass aquarium panels often inhibit light transmission.
Better insulation and strength don't comprise weight either. Acrylic aquariums weigh in 50% lighter than comparable glass aquariums. Therefore, transporting a customizable acrylic aquarium requires less effort, energy and support.
Acrylic aquariums are impressive. Their overwhelming advantages put glass aquariums on the endangered list. As a confirmation of acrylic advantages virtually all modern public aquariums are built using acrylic. The greater ability to customize size and shape are a major attraction, while leak and equilibrium protection make acrylic better for hard to keep species. Now you know the advantages of acrylic over glass, it's time to put that information to use by designing your very own custom aquarium.
Having a good aquarium filter can make the difference between enjoying fish-keeping or not. Here are descriptions of the different kinds of aquarium filters available, what kind of tanks they are best for, and the overall pros and cons of each option.
These small clear plastic box filters have an airstone that pushes water up through layers of floss and charcoal. The box sits in the gravel in a corner of the tank. Sometimes they need to be weighted down to keep them from floating. They are very cheap, but not terribly efficient. While they do add some aeration to a tank, you are not going to clean up a dirty tank with this kind of filter.
Sponge filters
These are similar to corner filter, but there is no floss or charcoal or even a plastic box -- all filtering is done through a sponge. Again, this is not a very efficient filter, but it does help. Sponge filters are used in fry and quarantine tanks because they create no strong currents, and they do clean up a tank a bit, and they provide some aeration. Fry may also enjoy nibbling algae off the sponge.
Undergravel filters
Undergravel may be the best choice for a standard community tank. You can also combine an undergravel filter with an exterior box filter for some extra clean water. The benefits are that undergravel filters are relatively cheap, they do a good job once they are established, and they do not create strong currents that some fish, like bettas or discus, will not like. These filters use biological and mechanical filtration by pulling the dirty water in the tank down through the gravel. The plastic aisles of the undergravel filter hold the gravel up so there is a small space at the bottom of the tank. This is where most of the debris is captured. The clean water is pushed up through two tubes on either side of the back of the aquarium and pushes the clean water out -- fairly gently -- through two window-shaped grates.
Undergravel filters use your aquarium's gravel as the filtration media. While there is mechanical filtration, most of the action is happening via biological filtration in the gravel. So these filters may take a few days to show you clean water. There's also no way to upgrade them aside from adding a powerhead, which is only going to add more pull. You will also need an air pump to run an undergravel filter. The stronger it is, the more filtration you will get.
External/hang on the side filters
These filters are boxes that do most of their work just outside of the tank. They hang on the side with an uptake tube that goes down into the tank. The dirty water is pulled up the intake tube and pushed through a series of sponges and usually a bag of activated carbon. This performs biological, mechanical and chemical filtration. The clean water is pushed out through a trough formation that spills into the tank.
These kinds of filters do create a bit of current, especially if you have got a large tank. They can handle tanks up to 100 gallons, and if you had a larger tank than that (lucky you) you could just add a second filter. These kinds of filters have to be cleaned about every week to two weeks by squeezing out the sponges until all the trapped particles are released. Sometimes small fish get caught or pulled up by the intake tube, but this only happens with very, very small fish. That said, do not use these kinds of filters in a fry tank. Otherwise, they do a pretty good job and are a very good filter for the money. They run about $20 for a 20-gallon tank. "Trickle" filters are similar technology.
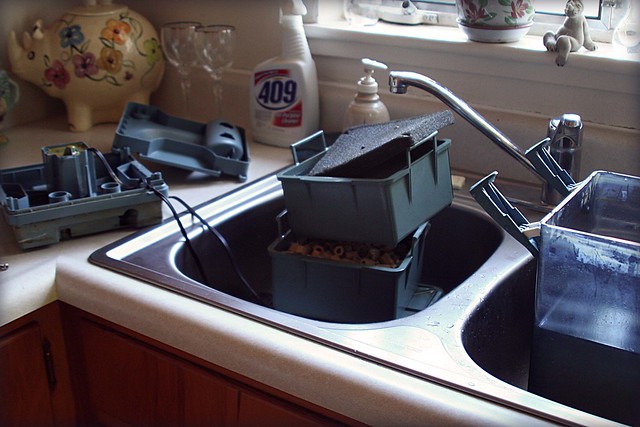
Canister filters
These are the "big dogs" of the filter world. Unless you have a community tank that is over 50 gallons, using a canister filter is a bit like swatting a fly with a cannonball. The benefit to canister filters is that they do a very, very good job and you do not have to clean them more than once a month if that.
Some people "cheat" and buy canister filters made for tanks two or three or even four times the size of their aquarium and then (sometimes) they can get away with cleaning the filter less than once a year. If you have lots of extra money, but very little extra time, this is a viable trick for those of us who hate cleaning the fish tank (you still have to do water changes, though). The downside is that cleaning canister filters is a big deal and they are quite expensive ($75 to $300).
Pamella Neely writes about betta fish care and betta fish tanks.
1. The protein skimmer can remove the organic wastes almost as soon as they are formed in your aquarium. That means you are able to eliminate them before they are disintegrated by the bacteria in the tank into a nitrogenous matter. Nitrogen in the tank can be harmful, as it will interfere with the properties of the water and even get converted into toxic forms that could be life-threatening to the inhabitants of the aquarium.
2. If you are continuously removing the organic protein wastes from the aquarium with the skimmer, it is obvious that the aquarium will not require frequent water changes.
3. Apart from the protein wastes, the protein skimmers are also capable of removing fatty substances that collect in the tank and some carbohydrates. Even organic molecules containing elements like copper can be eliminated.
How do you choose a Protein Skimmer for your Aquarium? But, though a protein skimmer is a very essential device, it is also one of the most expensive additions that you will make to your aquarium. That is the reason why you should buy the most suitable skimmer, as it will be a one-time expense you will make. A good protein skimmer will also be durable and will be with you for a long time.
Here are the different types of protein skimmers that are available in the market. You can decide what to buy after understanding the types available.
1. Co-current Protein Skimmers – Co-current protein skimmers are called so because here the water from the aquarium is made to move only in one direction (upwards), and the bubbles move along with the flow of the water. The exchange of wastes is done between the water and the bubbles as both moves towards the top, side by side.
2. Counter Current Protein Skimmers – In counter current protein skimmers, the bubbles move downwards for a while as the water moves in the upward direction. The bubbles move downwards for some time, till the exchange takes place and then they take the waste matter to the cup on the top. The advantage is that the counter current mechanism facilitates for better contact between the dirty water and the bubbles and hence more effectiveness.
3. Circulating Current Protein Skimmers – These are a new development, in which the mechanism is the same, but the water is made to enter into the protein skimmer a number of times through a circulating device. This increases the time of contact and ensures a high degree of purification of the water.
Your choice of a protein skimmer will certainly depend upon the type of aquarium and the budget. The co-current protein skimmers are the cheapest, and they are quite effective for small size freshwater and saltwater aquariums. Prices are high for the counter current variety, and the circulating ones are the costliest. But it you have a very large aquarium, like the ones they keep in commercial places, you will need a powerful protein skimmer. In such cases, counter current and circulating current protein skimmers become essential.
The effects of choosing a bad substrate are not as obvious as bad Co2, lighting or heating choices for your plants, but the long-term effects can be devastating. Changing a substrate in an established aquarium is one of the hardest procedures you can undertake.
240 litres aquarium with different fishes, plants and a big root. Species = Fishes: Pterophyllum scalare, Trichogaster leeri, Paracheirodon axelrodi, Macropodus opercularis, Ancistrus sp.. Aquatic plants: Echinodorus, Anubias barteri var. nana, Hygrophyla difformis, Microsorum pteropus 'Windeløv, Micranthemum micranthemoides, Vallisneria sp, Echinodorus tenellus, etc. (Photo credit: Wikipedia)
Substrate is a source of nutrients for your plants and secondly serves to hold whichever plants you would like to keep in place. At the very least you will want to choose a substrate which is rich in the macronutrients that your aquarium will need. A deficiency of macronutrients results in many unwanted physical effects in your plants, ranging from discolouration and dis figuration, to browning and death. Needless to say, it is important that your plants have all the nutrients that they require. Although it is possible to supplement some of them via fertilizers, this can introduce water chemistry issues of its own.
When choosing a substrate, try to establish what macronutrients that it contains. It is helpful to make sure that your chosen substrate is intended for your kind of aquarium. If you were to choose a substrate that was designed for salt water aquarium use, you run the risk of releasing unwanted slats or minerals into the water. In the case of crushed coral, this may raise the pH of the water to an unwanted level and the potential knock-on affects of this can be deadly.
One of the best ways to work out what would be good for your aquarium is by locating the hobbyists themselves. Forums are often priceless in helping you find exactly the right combination of materials to make your own substrate. You will also find recommendations for commercially available substrate for your aquarium, be it tropical, freshwater, marine or salt. It is always worth taking forum recommendations with a pinch of salt, unless a full overview of all the macronutrients and general use of the substrate is given. Some examples of good major brands of substrates would be Fluorite, Eco Complete and ADA Aquasoil. Before you buy anything, read the manufacturers packaging carefully.
When choosing your substrate, try to provide a substrate of three to eight millimetres per grain. Too much is as bad as too little; with too little the roots will be suffocated and with too much, there is not enough contact with the roots. You will need to do your research, with the kind of aquarium you keep in mind to find the best thing for your plants and fish.
With live aquarium plants you can overcome all the problems of a non-planted aquarium. You can improve the quality of your aeration, filtration, food and algae control. You can improve the lives of your fish.
Find out how live aquarium plants can help you, help them.
By Sean Norman Sean Norman is an environmental science student and freelance writer with a deep love of ecology. Article Source: EzineArticles
I am shocked and surprised how often I come across marine aquariums (reef or fish only) that have no U.V. sterilizer filter. These aquarists are playing Russian roulette with their aquariums, running the risk of being vulnerable to a parasite outbreak.
A low pressure mercury vapor discharge tube floods the inside of a hood with shortwave UV light when not in use, sterilizing microbiological contaminants from irradiated surfaces. (Photo credit: Wikipedia)
There are many different situations that can cause a disease and/or parasite outbreak in your marine aquarium. It could be adding new fish, or perhaps one of your fish changes sex and throws off the entire pecking order, or a fish dies or is removed and that throws off the pecking order; or say your chiller (if you have one) went on the fritz during a heat wave - and the list goes on.
And given that there are so many situations that could spark a disease or parasite outbreak, wouldn't you want to protect yourself (and your fish) against this likely possibility? Who wouldn't? And yet many aquarists don't have a U.V. sterilizer on their system. It's like rolling the dice and crossing your fingers, hoping you don't have a disease outbreak.
So, before I go any further, let me just say that - yes - you definitely need a U.V. sterilizer. That is, if you want your fish to live for years rather than months, and if you want to avoid even the possibility of a total system meltdown (scary scientific term). Yes, this is my opinion, but it is also backed up with over 11 years in keeping saltwater fish (primarily reef tanks) with only three disease outbreaks - and two of them were caused by human error. By disease outbreak, I mean multiple fish dying from parasite infestation. This is attributed to aggressive use of U.V. sterilizer filters. And don't forget, I'm not talking about just one tank. I run a high-end custom aquarium design, installation and maintenance business, where we service many customers with large saltwater aquariums.
So, yes, it's a bold statement. And it also happens to be true. See - I don't like problems or surprises when it comes to aquariums. Over the years of running my business, I have had to develop ways of preventing problems from even being able to happen on our customer's tanks; and then having designed the system to be prepared to accommodate the problem if it ever does happen. This is sort of our company philosophy to aquarium system design and it is a preventative approach designed to prevent problems - so that we put far less energy into reacting to and fixing problems. Any way - enough of that. Back to U.V. sterilization.
By now, you might be thinking "yeah right - I don't believe you". Well, I'm not saying that we've only seen parasites on some of our fish three times in 11 years. NOPE. We see low-levels of parasites on fish fairly often - but those fish are thriving and healthy and live long lives - typically for over five years, and are able to fight off the parasites. AND the parasites are not aloud to bloom to dangerous levels because the U.V. sterilizer kills the parasites when they are water born (verses dormant in the substrate) and looking for a host.
So, what is a U.V. sterilizer filter? The U.V. stands for ultraviolet sterilization. Basically, it contains a special light bulb which emits U.V. "C" light. U.V. "C" is the band of U.V. light that gives us sun burn. So, essentially, a U.V. sterilizer filter is "sun-burning-to-death" (scientific term) or sterilizing your aquarium water as it passes through the filter, and thus killing any water-born parasites. It runs 24/7 and is very cheap to operate and can PREVENT parasite outbreaks. What aquarist wouldn't want to be able to prevent a parasite outbreak? This is why having a U.V. is a no brainer MUST HAVE filter for your aquarium.
In addition, the U.V. filter will prevent bacteria blooms (caused by water-born bacteria - milky or cloudy water) and phytoplankton blooms (cause of green water). The result here is clear water. Of course, this doesn't remove the underlying cause of the bacteria bloom (excess organics and insufficient bio-filtration) which must still be dealt with.
Sizing is probably the most important factor when selecting your U.V. sterilizer for your aquarium. My general advice is to slightly oversize your U.V.. Most sizing charts are based on aquarium/system volume. The last thing you want is an undersized U.V., because then it is almost useless (i.e. it is too small to prevent disease outbreaks). Several parameters to consider are system/tank volume, water flow rate through the U.V. filter, and bio-load (how much life is in your tank). So again, when selecting your U.V. sterilizer, choose the next one up in size, as recommended on the sizing chart.
Example: If your aquarium is 100 gallons and the sizing chart recommends a 30watt UV for a 90g and a 40watt UV for a 120g, then go with the 40watt UV.
One of the primary criteria used in sizing a U.V. sterilizer is the water flow rate through the unit. See, if you send too much water (too high of a flow rate) through too small of a unit, then it won't be effective in killing the parasites. But for me (I'm lazy), that is too much work, calculating flow rates, etc., so what I do is take the manufacturers recommended sizing for my aquarium (gallons) and then choose the next larger size U.V.. This almost ensures that your U.V. will be effective in killing water-born parasites in your aquarium and preventing a disease outbreak. And nine times out of ten, if you do the calculations of water flow rate, UV kill rate, and total system volume, you will end up at the same size U.V. any way. One caviat here - this method is based on average bio-loading (average number of fish/invertebrates etc.) for any given tank volume. So if you are crazy aggressive with your stocking density of fish/corals/invertebrates/etc., then you may even want to choose a U.V. that is two sizes up.
Of course, U.V. is not the only effective way to sterilize against disease and parasites. Ozone is very effective if applied and monitored properly. But Ozone is far less forgiving than U.V., and while you cannot CAUSE any problems by over sizing a U.V. filter, you can cause BIG PROBLEMS by improperly applying and monitoring ozone. But more about ozone in future posts. For now, suffice it to say that U.V. is very safe and simple to apply to your aquarium filtration system, and there is no monitoring (unlike ozone).
You do need to ensure proper upkeep or maintenance of your U.V. sterilizer. Once a year, you must change the bulb and the O-ring and/or gasket, and clean off the quartz sleeve (housing the bulb). This may take 30 minutes to an hour to do, but is necessary because after a year of operation, the bulb has begun to lose its potency and the ozone gas produced by some U.V. bulbs will break down the O-ring and/or gaskets that seal off the quartz sleeve. And in some systems the quartz sleeve can accumulate mineral deposits that may reduce effectiveness of the U.V. bulb. A simple overnight vinegar bath and wipe-down with a sponge will do the trick.
Generally, I'm not big on having opinions. I like to be open-minded, and opinions tend to cut us off from being open to learning something new. But when something works as well and as consistently as this does, well, I feel strongly about it. The proof is in the pudding, as they say. I hope this is of help to you.
The novice aquarist must face a variety of problems when a new tank is started. Beginning aquarium woes often commence with the lack of understanding exactly what is going to happen in the first six weeks the tank is active. Without knowing what processes are occurring invisibly in the aquarium, too many beginners overload the aquarium with fish right away and sentence their new pets to death by their own excretions. The fish actually create the majority of the poisons that kill them!
Often the rest of the deadly compounds comes from excessive feeding that rots and promotes decay. In the new aquarium, Ammonia is produced by the fish and decay processes. It can rapidly build to toxic levels. If the pH is acid (below 7.0) the toxicity of ammonia is often minimal, even in what could be considered high concentrations. However, it rapidly becomes extremely deadly when the pH reading rises over 7.0. The higher the pH, the more dangerous ammonia becomes, even in smaller concentrations.
Nitrogen Cycle in aquariums. Legend: (1) Addition of food and nutrients, (2) Production of Urea and Ammonia by Fish, (3) Ammonia is converted to Nitrites by beneficial Nitrosomonas bacteria, (4) Nitrites are converted to Nitrates by beneficial Nitrospira bacteria. Less toxic Nitrates are removed by plants and periodic water changes. (5) Evaporation. (6) Light, (7) Soil, (8) O 2 produced by plants, (9) CO 2 produced by Fish (Photo credit: Wikipedia)
As time goes by, even starting from a sterile environment, beneficial bacteria that specialize in using the ammonia as an energy source establish a foothold. With enough time, adequate populations develop that can reduce the ammonia as quickly as it is produced. They produce nitrite as a by-product. Nitrite has no relationship with pH or any other water characteristic. As nitrite rises in concentration, it is equally deadly for fish in any water conditions. Once again, nature has provided a bacterial strain that will rapidly eliminate nitrite, nitrobacter. The specialized bacterial strains use nitrite for energy and create nitrate as the final step.
Nitrate is a good plant fertilizer, but otherwise is not removed by standard processes in the aquarium. It constantly builds to levels that eventually become harmful to fish. There really is no reliable way to remove it other than by dilution. The standard water change is the most effective method to remove high levels of nitrate with the waste water. Fresh tap replacement water replacement normally has low or non-existent amounts. As new water is added to replace siphoned used aquarium water, the overall levels of nitrate are lowered and controlled by this simple method.
The entire system heavily depends on a strong and vibrant population of two separate bacterial strains (nitrosomonas and nitrobacter) doing their job. In addition there are a multitude of other bacteria that are constantly at work breaking down waste materials into component parts this is the natural decay process. A big part of this waste removal is the production of ammonia. In the very beginning, there are no bacteria of any kind to start with, they have been killed by the chemicals water companies put into the water supply to make it safe for human consumption. Assorted bacteria strains do start to populate quite quickly, but as far as the invisible bacterial world is concerned, ammonia and nitrite reducers are quite slow to replicate. There are many other types that are much faster to exploit a suitable niche and can inhibit nitrosomonas and/or nitrobacter from thriving.
It takes ten days in a perfect environment for a single starting bacteria that reduces ammonia to populate the billions upon billions of its fellows required to eliminate ammonia as soon as it occurs. The bacteria that reduces nitrite to nitrate is even slower to replicate. It has the further disadvantage of being inhibited when there is too much ammonia present. Once the ammonia removing bacteria are plentiful enough to eliminate ammonia immediately, then these weaker strains will begin to grow, taking another three weeks to get to high enough densities to remove nitrite immediately as well.
Biological Augmentation of the bacterial filter
The above is a very brief synopsis of the Nitrogen Cycle, it is meant neither to be complete or exhaustive, but the timing of the bacterial population crests are important. It is this long lag behind many other types of bacteria all fighting for the same space and elements that gave rise to the concept of bacterial augmentation of the biological filter. Although there are disagreements of which particular strain of bacteria that actually do the work removing ammonia, classically it has been defined as nitrosomonas, and few would argue that these are the bacteria that can do the work. In the past few decades, certified pure strains of both nitrosomonas and nitrobacter have been isolated and cultured quite successfully. Even before this advance, it was long felt that if you added these bacteria to the aquarium directly, they would help reduce the length it takes to get the populations up to size as well as keep the actual concentration levels much lower.
In the very early days, this was done by simply grabbing a handful of gravel from an old, established aquarium and adding it directly into the new aquarium. Since both of these previously mentioned beneficial bacteria are lithotrophic and attach firmly to clean hard surfaces, this did work to inoculate a beginning aquarium with the bacteria living in the old tank, whatever the strains. There was always the risk that the older tank had other, less desirable strains that tagged along as well. Many tanks introduced a disease into it along with the beneficial bacteria.
Then came the first bacterial suspensions that contained living bacteria, in the early 1980's. These were actual living and breathing bacteria, bottled active and alive and sold with very short expiration dates. The concept was to provide a concentration of specifically cultured bacteria that do a particular job and supercharge a new system with them. The spikes of ammonia and nitrite were felt to be reduced and the fish had a better chance of surviving the break-in ordeal. The main drawback of this first product was that it went out of date so fast. You had to get it right off the truck and use it immediately, as every hour saw the loss of some more of the bacteria.
Soon a newer product arrived that was able to deliver much higher concentrations of both bacteria, coupled with some of the best waste reduction bacteria in the same bottle. The shelf life, from culture vat to consumer was extended because it exploited the newest technology, which allowed pure cultures of nitrosomonas and nitrobacter along with a few powerful waste reduction strains to be cultured into extremely high concentrations and then shut down and forced to hibernate until the bottle was opened. The advancement of causing the dormancy of the bacteria was thought to be impossible, and although many seem to believe it still can't be done, the success of the product for over 20 years on the market proves it to be viable.
When the technology advanced to the point where billions of bacteria spores and hibernating cells were concentrated into every ounce, the concept of competitive exclusion also became a reality. Unlike throwing a handful of gravel into a new tank and hoping the right bacteria strains make it, the ability to culture a pure strain of bacteria, mix it with other pure strains to form a team allows the knowledge of exactly what is being put into the aquarium. By dosing in recommended amounts every week, the balance of population is shifted in favor of the strains being added. Over time, they become the dominant bacterial strains, which is fine, because if other pathogenic species appear, they are crowded out by the more dominant types. This is the definition of competitive exclusion, inoculating the aquarium with the beneficial bacteria and crowding out potential pathogens.
Many companies have provided products like this to the market, have a friendly chat with your local life fish store about which one of these preparations they recommend. By regularly dosing the filter and aquarium with billions of bacteria every week, the tank stays in better health and actually seems to run with less chance of bacterial disease. Fungus is also reduced as the amount of waste is more rapidly decayed to composite parts before a problem can occur.
Steve Pond
Having kept and bred many different types of tropical fish for the past forty years, I am dedicated to providing information required for the novice aquarist to become successful in this fascinating hobby. Keep tropical fish alive and thriving in your first aquarium through the critical first six week and beyond. Visit my blog website (http://www.noviceaquarist.com/blog) for more detailed information specifically tailored for the novice aquarist on all aspects of the beginning aquarium. Besides my own personal contributions, a variety of other sources are polled and added regularly to the content warehouse available there.
You've seen all those chemicals at the Pet Store, and you've wondered if you'll need one bottle of each of them. And then you wondered if you still want to get into this aquarium hobby after all. Well, here's the good news, most of that stuff is unnecessary, even worthless. Don't get me wrong, you'll occasionally need some of these products, but there is only one of these chemicals that you'll always use, so let's start there.
The tap water that you are using to fill your tank, it contains chlorine. It's harmless to people, deadly to fish, so you'll need to remove it. Now, don't panic, you won't need one of those kits that Grissom uses on CSI. Indeed, a single bottle of dechlorinating liquid is cheap and lasts for months. Just make sure that you read the label because some of the products are concentrated differently, so some of them require fewer drops per gallon of water.
The chlorine in your tap water actually dissipates fairly quickly, completely breaking down in about 24 hours. So in a pinch, you could just fill your bucket and let it stand for a day before using the water, but with the cost of dechlorinating products so low, it hardly seems worthwhile. Just remember, if you chose to use the "let stand" method, make sure you place your water in a location where it will not be contaminated.
You should also invest in a bottle of test strips. These strips, after being dipped into water, will show you a variety of information about your water. Your Ph level, water hardness, ammonia level, nitrates, and nitrites can all be tested using the most common dip strips. That's a lot of information; in fact, it is more than you'll actually need.
The truth is that most commonly sold aquarium fish will do just fine in any normal Ph range or water hardness level. Don't worry if your fish type comes from Peru where it lives in soft acidic water because the fish you bought was probably born and raised in a fish farm in Florida. Then it was packaged up in a big bag of water and sent to your pet store where it was dumped into the local tap water. Most fish are NOT that picky, but they do need clean water, and that's where the test strips come in handy.
When your fish eats, it produces waste. This waste then breaks down into ammonia, which in turn changes to nitrites, and then into nitrates. Like chlorine, these chemicals can damage and even kill your fish. So you need to remove them if they rise to a high level. The test strips will tell you if your levels are too high, and if they are, your answer is fairly simple-it's time for a water change.
Once your tank has been established for a few months, you will not have to test it as often because your tank will develop beneficial bacteria that help break down these chemicals more quickly. For the first few months though, you should probably check your tank once per week or so, making sure you have time to do a water change if it should prove necessary.
And that's basically it. Oh, there are chemicals that will lower your Ph, or raise it, medications for sick or injured fish, chemicals to destroy algae, expensive aquarium salts, and all manner of other niche products that you really do not need. These products are available to keep the fish store in business. Most people and their fish NEVER need these products, so unless you have a sick fish, just stick to the basics. You'll save some money and avoid driving yourself crazy.
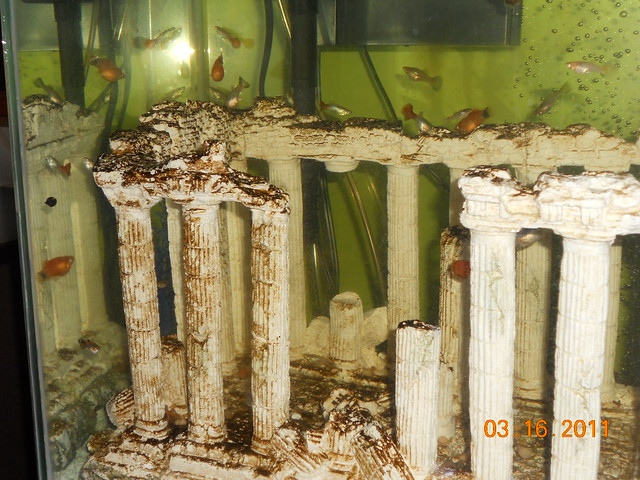
Aquarium ornaments aren't there to add any benefits to the fish, they are just for you to add some decoration in the tank. You can have all sorts of ornaments, big or small, traditional or caricature, simple or even complicated. There are thousands of different ornaments that you can buy in stores or you can even make your own. However ornaments are not for all fish, some fish don't like them, I know for a fact Oscars don't take well to any type of ornament or even plant. Some fish do need them though, basically to hide or live in and keep away from bigger fish.
Traditional ornaments are ornaments like castles and ships, they provide security for smaller fish from the bigger ones, they also provide a place to stay and play, yes fish do play! Fish ornaments are available in pet and fish stores. They tend to range from very low to very high prices. You can of course get more detailed ornaments that aren't shaped to be anything except for like branches with weeds on them. Some fish need their ornaments to resemble their natural home, for example lots of plants and branches in the tank.
If you have amphibians in your tank they often like a waterfall ornament with a bathing pool at the bottom of it so that they can bath in it. Amphibians need a lot of greenery in their tank as this resembles their home and therefore you should try to make sure that you fill you tank full of it! Aquarium ornaments are easy to come across and they don't take much effort to put in the tank.
You should always try to keep the ornaments like the animals natural habitat unless it is a fish that couldn't care less, like goldfish for example. Goldfish are very easy to keep and you can decorate their tank with all sorts of funny ornaments. With smaller fish you can try to decorate their tanks with funky ornaments but I always feel that the traditional ones are better!
This article will discuss some of the more common aquarium lights (lamps) available as well as a few that are not as well known such as the SHO and T2 bulbs/fixtures.
Common aquarium bulbs include the:
*Metal Halide (MH); These are the reigning "Kings" of reef aquarium due to depth penetration, output, spectrum, and over all beauty and amount of coral life they help support. Even the newer T-5 lamps cannot achieve the depth penetration and overall output of these lights.
Metal Halide work via a gas mixture of halides and other elements. The actual light production comes from the small bubble of gas that is held in place by metal wires and/or supports. The electricity running between them and the small gas bubble, heats them, similar to an incandescent filament. This is one of the reasons that Metal Halide bulbs give off more heat than other bulbs.
The downside is the heat that MH lights produce, often resulting in the need for hood fans and even chillers. Two sizes I most often have used are the 10,000 K 175 watts and the 20,000 K 250 watts for really deep tanks (over 30")
*LED: The new reef compatible LED is likely to take over the market as they become more readily available, the price comes down and watts per lumen come up. These lights do not have the heat problems and are very compact. LED lights may prove to be more suitable for aquatic life tank-lighting and reef tanks because they offer superior flexibility when compared with traditional fluorescent lighting. When LED lights operate, the photometric radiation remains within a narrow band on the electromagnetic spectrum. Specific photometric wavelengths are often beneficial to some aquatic plant life and reef tanks. Controlling specific wavelengths becomes possible through a basic network of colored LED lights connected to a digital LED controller. Since LEDs emit light only in very specific direction, the installer has the option to illuminate a precise area by simply rotating the polycarbonate tube casing. The water resistant casing also provides the LED circuitry with adequate protection against moisture and chemicals found within the fish tank or reef tank.
So far the there are mixed reviews on the larger units such as the Solaris that replace the MH. The manufacturer of the Solaris claims "PAR light output levels equal to a 400W MH 20k. It uses 40% less energy than the 400W MH 20k fixtures it replaces. The life of the LEDs is approximately 50,000 hours, so it almost eliminates metal halide and fluorescent bulb replacements. All heat is radiated up and away from the tank; therefore, it does not heat the water like Metal Halides or Fluorescents. This eliminates the need for Chillers." However data shows 20 lumens per watt, MH bulbs provide around 50 lumens per watt as the output.
*T-12; a standard pin, 1-1/2" wide bulb. This bulb will generally use more watts per lumen output
*T-8; a standard pin, 1" wide bulb. As compared to the T-12, a 48" T-12 will use 32 watts, while a 48" T-8 will use 32 watts.
*T-5; Generally around 13 mm in diameter. This is a mini pin bulb which generally uses even less watts per lumen than many than T-8 bulbs.
*T-2; These bulbs are the latest technology yet. They measure only 7 mm and allow for several bulbs in a small space. A 13 watt 20 inch T-2 Bulb (6400 K) produces 950 lumens which is 73 lumens per watt in a very small space!
Quite bluntly, these T2 lamps and fixtures are about the best bulbs in a small space I have seen! These are very useful for small planted aquariums or Nano Reefs or even shelves for betta breeders. I expect these new T-2 lamps to sweep the smaller aquarium keeping hobby due to their extremely high efficiency and out put.
*VHO; this stands for "Very High Output". These come in T-5 thru T-12 standard fluorescent tubes and in the newer power compact (usually 4 pin) lamps such as the New generation Via Aqua Helios VHO. The new Helios come in a variety of sizes with outputs up to 180 watts out of lamps under 40 inches in length, which rival many Metal Halide (although not in depth penetration). These new higher output VHO fixtures/lamps have higher Kelvin and wattage output than previous generation VHO lamps/fixtures of similar size. These can be used for both marine reef applications as well as freshwater planted aquariums (these new VHOs are not scheduled for full release to the public until early 2008).
*PC; this stands for "Power Compact". These bulbs come in straight pin arrangements, square pin arrangements, and the ever more popular self ballasted standard incandescent fixture "screw in" type. These bulbs along with T-5s tend to be the most efficient.
A new Power Compact that in my opinion is awesome for planted aquariums and even for reef aquariums (as an addition to LED or Metal Halide) is the self ballasted SHO (Super high Output) PC bulbs. The 105 Watt SHO Daylight bulb puts out 6300 lumens and is comparable to a 525 watt Standard bulb (click on the picture for a link). This comes out to 60 lumens per watt, however this is a deceptive guide, as you can fit many more of these bulbs in a given space and also utilize more efficient reflectors.
The SHO can be mounted into your hood using a standard incandescent fixture or better, hung as a pendant light using reflector similar to how Metal Halides are commonly installed
For more information about aquarium lighting, please see this URL from which this article is snipped in the resource box:
If left in the tank the waste materials will turn the water cloudy, or even yellow and can cause a buildup of algae on the aquarium's sides. Plus it can also prevent the fish and corals (if you have any in yours) from growing in the way that they should, along with causing them stress, and this in turn could lead to them becoming ill. So the question you should be asking yourself is not should I change the salt water in the aquarium, but when should it be changed?
When Is The Right Time To Change Aquarium Salt Water?
Ideally you shouldn't be leaving the tank until such a time (maybe several months) before you change the aquarium salt water and provide all the tropical fish and invertebrates within it, a new clean environment. The big problem is that many people choose to remove the tropical aquarium fish and invertebrates from the tank, and then clean out the water completely. Unfortunately this could do your tropical fish, invertebrates and the reef inside more harm than good.
Rather what one should be doing is change a small amount of the salt water on a regular basis, and keep the fish and invertebrates in the tank as you do it. Ideally the best ratio when it comes to changing the salt water is to remove about 1/3 of the water from the tank and replace with the same amount of water.
Simple Steps To Take When Changing Aquarium Salt Water
First off you need to unplug every piece of electrical equipment, other than the light which is connected to the aquarium. The pumps and filters if left on, can actually overheat if they discover there is insufficient water in the tank. Also heater systems if left on when new water is added to the tank, may well cause the glass to crack (remember how much that tank initially cost and the price you will have to pay to replace it).
Take an aquarium scrubber or scraper accessories and use this in order to clean the inside of the glass of the aquarium to help remove any buildup of algae or waste deposits that have come from the fish food on them. You need to do this very slowly and gently in order to prevent the fish species from becoming panicked.
After scraping the glass you need to take out any plants within the tank and remove any dead or dying parts on them. Also stir up the gravel in the base (be careful as some fish like to bury themselves in it). As you do, bank some of it high towards the back corners of the aquarium and leave the levels lower in the middle and the front. Give the gravel time to settle and you will see waste deposits accumulate on top of the lower lying gravel.
Now you are ready to siphon off some of the aquarium salt water (remember only to take away around a third of the tank's water and no more). As you siphon off the salt water using one of the specialist aquarium products that allows you to drain water from the tank at the same time as removing the water, try to remove as much of the debris that has accumulated as possible.
Next you need to replace the water that has been removed and it is best to use aged rather than freshwater. This you can do by either letting it stand for some time or by adding certain salt mix products to it. You should only ever add aquarium salt to your water and never just sea salt. Also make sure that the temperature of the water you are putting into the tank is within 2 degrees Fahrenheit of the temperature of the water already in the tank. Then add some aquarium salt if you want.
Finally, all one now needs to do after changing the water in your tank is to plug back in and turn on the pieces of equipment that you originally turned off at the start. Also why not at this stage give the cover of your tank a cleaning and the light along with the outsides of your tank.
Because it is imperative that discus fish have optimal water conditions, much has been written about this subject, This is the plan put in place to insure proper PH water levels in our hatchery.
Allnut Enterprises' breeder, Nick Lockhart of Noblesville, Indiana, has many ingenious ideas as to how to accomplish things in the hatchery. We begin our experiment with two matched pairs: two red melons, and two leopardskins. They are lovely, friendly fish, and have been getting acclimated to our tanks and the aquarist since the end of June.
Initially, we begin to prepare for the new arrivals by setting up the tanks in this manner: water was tested for PH and nitrite levels, and a proper ecosystem for active bacteria was begin by populating the tank with cichlids that Nick has been raising prior to the purchase of the discus. When we felt that the water/bacteria levels were correct, we set up the meeting with the breeder, and made the trip to Bloomington, Indiana.
Upon arrival at home base with a travel time of about an hour and a half, we immediately begin to acclimate the pairs to their new home. We were advised by the breeder to let them acclimate to the new tank water by "floating" the bags containing the fish for approximately one hour to equalize the temperatures, and to add a cup of water to the bag from the tank to equalize PH levels.
We did not, however, follow this procedure. We took approximately six hours to acclimate by adding a cup of the tank water to the bag each hour, and keeping a close eye on the discus and PH levels, because they were stressed from the trip. A Hanna PH digital meter was used for testing, which gave us a very accurate reading. As large changes in PH in a short period can shock the discus, we were careful in this approach. Our water at the time matched the water in PH levels from the breeder closely.
Because the two pair were bought for breeding purposes, Nick was not comfortable with the PH level, which at that time was at approximately 7.5, high for optimal breeding conditions of 6.5-6.9. What to do?
We had read that hanging a mesh bag of peat moss would help to lower the PH, but were not happy with the idea of having debris from the Peat in our tanks, which are kept scrupulously clean. We knew there had to be a better way to accomplish this goal.
Because Nick lives in town, and has city water, he uses a Reverse Osmosis filtering system to insure that the water is free of chemicals and suitable for the aquarium. Knowing that Peat Moss will lower the PH in an aquarium system, and having a large bag left over from making culture for Grindal and White Worms, he took a 5 gallon pail, and drilled a series of holes around the perimeter of the bottom of the pail, using a 3/32" drill. He then lined the bottom of the pail with a think layer of regular aquarium filter floss, and topped that off with a thick layer of Peat Moss, with the finished pail being about two-thirds full.
The outlet hose from the RO system was then allowed to drain into this pail. Setting the pail over the top of the holding tank, the water slowly drained down through this medium into the holding tank.
Initial test of the recycled water showed a drop in PH to below the base of 7.0. We have been adding the water to the discus tanks slowly through water changes so as to not shock the fish, and at our business meeting this weekend, Nick informed me that the PH levels in the discus tanks are now at approximately 6.6, which is the optimal level for breeding discus.
Cost of the project? If you already are using an RO system, and have a holding tank, you will spend a twenty dollar bill getting the Peat Moss and filter floss. Not bad, considering a breeding pair of dicus can run you $425 dollars!
Alden Smith is CEO of Allnut Enterprises, a diversified company, and is involved with discus breeding. His website is http://www.kingdiscus.blogspot.com
As a marine aquarium keeper, it's your job to maintain an environment as close to what your organisms are accustomed to as possible. Unless your livestock came directly from Utah's Great Salt Lake, too much salinity in your water can be harmful. However, not enough salinity also can make your fish or coral uncomfortable. This is where a piece of equipment called a refractometer comes in handy.
What Is a Refractometer?
Because a refractometer can determine the salinity of your aquarium water, it is a tool worth having on hand, especially if you have a reef aquarium. A refractometer is a piece of equipment that measures the speed of light passing through a liquid, in this case through a sampling of seawater from your aquarium. The more particulates there are in the water, the slower light travels through the water. Depending on where the light falls on the refractometer's built-in scale determines the salinity in your marine aquarium. This also allows you to measure the specific gravity of your seawater. The specific gravity is the density of salt in your aquarium water as compared to fresh water.
The determination of salinity is based on the index of refraction. For example, if you use your refractometer in a vacuum, such as in outer space, the device's index scale should read 1.0000. The index for pure water is 1.3330. For seawater at 35 parts per thousand (ppt), the index reading should be 1.024-1.026. If your refractometer reads higher or lower than 1.024, then you may need to adjust the chemical composition of your aquarium water.
What to Look for When Purchasing a Refractometer
When buying a refractometer, make sure the one you choose is specifically for seawater use. Many refractometers on the market are manufactured only to measure the salinity of sodium chloride solutions. These types are referred to as brine or salt refractometers. They are good for measuring the saltiness of Aunt Sally's blue ribbon pickles, but, as you know, a marine aquarium contains more than just sodium chloride, such as trace elements, calcium, carbonates and magnesium. A seawater refractometer takes these into account.
You also want a refractometer that, once calibrated, automatically takes water temperature into consideration in the reading. Without this automatic temperature compensation (ATC), your reading can be misleading, since warmer water expands slightly, allowing light to pass through more easily. This means your tank of warm water may appear to have less salinity than is actually present.
Other handy aspects of a good refractometer include a dual scale that measures both specific gravity and parts per thousand, and an eyepiece you can adjust in order to clearly read the scale.
How to Read a Refractometer
First, open the cover to the refractometer's prism. Using a clean pipette, take a sample of aquarium water and place a drop or two onto the prism plate, then close the cover. Hold the refractometer to the light and look through the eyepiece, adjusting the eyepiece until you can clearly see the scale. One side of the scale measures the salinity of the water in parts per thousand, which for seawater should read 35 ppt. The other side of the scale lets you know the specific gravity, which is 1.024 for seawater.
As you look through the eyepiece, you will notice that the top part of the scale is blue, while the bottom portion of the scale looks white. Your reading should be taken at the spot where the blue and white meet on the scale.
For the serious marine aquarium person, a refractometer can be a great addition to your tool box, because you can receive more accurate readings than from the traditional hydrometer. But, the refractometer does need to be calibrated in order to give you an accurate reading. Follow manufacturer's instructions to properly calibrate your particular refractometer.