2017-12-21

Keeping DISCUS FISH: It’s all about the Water


First of all, you have to keep in mind that discus fish are considered to be one of the most beautiful types of fishes that people love to have in their aquarium. The aesthetic quality of discus fish is really eye-catching and once you are able to see one, you will surely want one as your own.

However, the problem with keeping discus fish is that they are quite difficult to take care of. You see, there are several factors that you have to keep in mind when you plan on taking care of discus fish as your pet.

Basically, taking care of discus fish is not that hard. Although first timers will find it difficult to care for discus fish, you will soon get the hang of it and start taking care of discus fish easily.

You have to remember that discus fish need very specific living conditions and diets. Many fish enthusiasts even say that beginners should not attempt to take care of this kind of fish as it will just frustrate them especially if they don’t know what they are doing.

Discus fish are very temperamental but if you do the necessary research and apply it in taking care of the discus fish in your aquarium, you will be able to have a discus fish that will thrive in your aquarium and also grow happy and healthy.

The secret to taking care of discus fish is the water. You need to keep in mind that unlike other fishes that needs no specific water condition to thrive, discus fish will need to live in special tanks with water that is specifically treated to the point that it mimics their natural environment.

By giving them the proper water condition they need to thrive, you can be sure that your discus fish will be able to live for a very long time and they will also be a lot healthier and more active.

The temperature of the water must be kept stable. In their natural home, discus fish usually thrives in water with temperatures between the range of 28 and 31 degrees Celsius. Any higher or lower than these temperatures will be enough to kill the fish or not let them survive for long. This is why you may want to invest in a water thermometer in order for you to constantly monitor the water so it won’t exceed or drop below the required temperature.

The acidity of the water should also be kept at a constant level. The water pH for discus fish to thrive in should be between 5.5 and 7. Any more acidic or alkaline than these numbers is a sure way to kill your discus fish.


Lastly, the water hardness should also be considered. Although discus fish are not that sensitive to water hardness, it will play an important role in keeping them healthy. The optimum hardness of water for discus fish to thrive in should be between 1dH and 8dH. This will be quite soft, which is perfect for discus fish to live in.

Remember these tips and you can be sure that you will be able to get your discus fish to thrive in your aquarium. This will not only keep your discus fish healthy, but it will also keep them happy and comfortable.


2017-12-20

What Types of HERMIT CRABS Should Be Placed in a Saltwater Aquariums?

Hairy Red Hermit Crab-Dardanus lagopodes
Photo  by Sylke Rohrlach 
Hermit crabs 
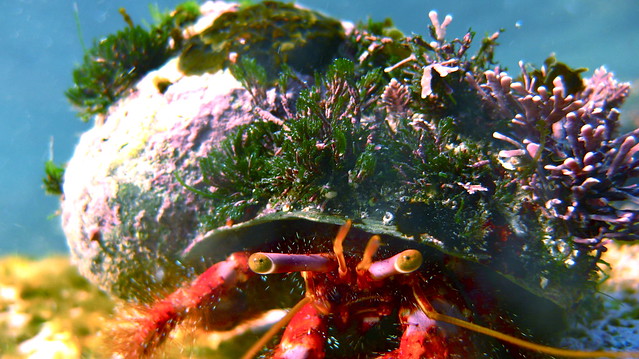
have been popular pets for adults and children alike for many years, and there are many who appreciate their unique beauty (and just as many do not-it's a matter of taste). With the increasing popularity of bringing a piece of the sea into the home, it is no wonder that the notion of introducing hermit crabs into a saltwater aquarium has been gaining in popularity.

Just as there are many types of hermit crabs that can be kept as pets, so too are there many different breeds which can be kept in aquariums. Not all have the same chance for survival if kept in captivity, however, and it is important that the aquarium owner make sure that they are familiar with all of the specific needs of their hermit crabs before they are introduced to the aquarium. Below is an introduction to some of the most common breeds of aquarium hermit crabs.

- Red Hermit Crab (Dardanus megistos)- Also known as the White-Spotted Hermit Crab this crab has red legs with black-edged spots. It is not a safe addition to a reef aquarium but is very useful in keeping algae growth to a minimum in a community aquarium. Only one crab per aquarium please; these crabs are very protective of their personal space.

- Red Legged Hermit Crab (Clibanarius digueti)-these Mexican crabs are a hardy addition to any aquarium, eating algae from the tank. They demand a low level of copper in the water, however, as their bodies cannot survive in the presence of this metal.

- Scarlet Hermit Crab or Reef Hermit Crab (Paguristes cadenati)-this hermit crab generally remains small, around two inches across, and has a red body with yellow eyestalks. They are very helpful in keeping the algae growth inside the aquarium under control; however, if insufficient algae are available inside the tank they must be supplementally fed with dried seaweed.

- Common Hermit Crab (Pagurus bernhardus)-These crabs are more common in Europe but can be found in other countries as well. Also known as the soldier crab.


Since these crabs carry their homes around on their backs it is important that they constantly have new shells available to them when they have outgrown their previous shell. A hermit crab in an improperly sized shell cannot grow properly. These shells can be purchased from a pet store or an online retailer or, if the owner is familiar with the requirements of their hermit crabs, these shells can often be found on a beach. If the owner chooses to go out into the wild and collect their own shells it is important that they choose the proper type of shell for their hermit crab to inhabit. As sea anemones are often an important part of the hermit crabs natural environment they make excellent tank mates, eating the leftovers when the hermit crab has finished a meal and cutting back on the amount of tank waste.

Hermit crabs are an intriguing addition to any tank and require very little maintenance once their owners are familiar with their needs and their habits. With the proper care, they can live for quite a while, providing endless hours of joy for their owners and their families.


2017-12-19

SPOTTED SILVER DOLLAR - Metynnis lippincottianus

SPOTTED SILVER DOLLAR - Metynnis lippincottianus


2017-12-18

Breeding the Bronze Catfish, CORYDORAS Aeneus

corydoras aeneus - bronze catfish side on
Photo  by h080 
Sexing
The female is a little bigger than the male, but the shape is a better way of telling the sexes apart. The female gets a bigger belly, and if looked at from above the female is clearly wider than the male.
The male has a longer and more pointed dorsal fin.

Breeding
The bronze Catfish 
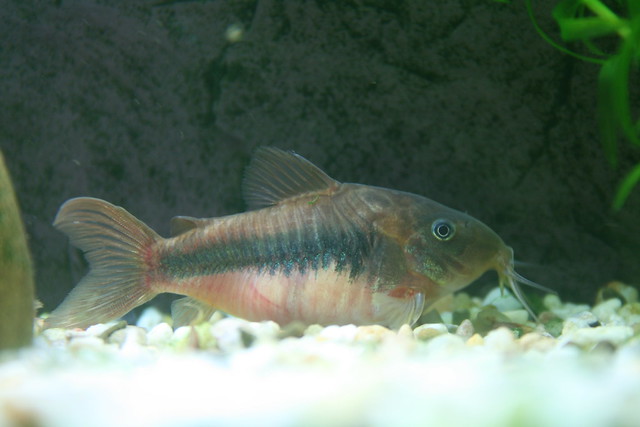
is probably the easiest fish of its genus to breed. The parents to be should be well fed for a while before breeding. It is common to use two males and one female for breeding. In the wild, this species will breed at the start of the breeding season. A drop in water temperature will often stimulate the breeding. This drop can be as much as 4 degrees C. Some people go further and lower the temperature by sprinkling cooler water over the surface of the water to simulate heavy rain. This fish is an egg placer. The female carefully cleans a number of places for the eggs. These places may be on the sides of the aquarium, or on the leaves of plants.

When they are ready the breeders assume the "T" position with the female's mouth adjacent to the male's vent. The female takes the male's sperm into her mouth ready for fertilization. She lays her eggs into a little basket formed by her pectoral fins and carefully places the fertilized eggs onto the prepared places.

The number of eggs laid each time varies between 1 and 10. The breeders repeat this until the female has laid all her eggs. This may be up to 300 eggs and the spawning will sometimes take several days.
When they are first laid the eggs are nearly clear, but they darken to a golden brown. If they turn white they are infertile. Infertile eggs get fungus which can spread to healthy eggs. Generally, the eggs are separated from the parents because some people have observed Bronze Catfish eating their own eggs and young. The eggs hatch in about 5 days.

Fertilisation
The method of fertilization used by many corydoras catfish is in dispute. The old idea was that the sperm goes very quickly through the female's digestive tract and comes out of her vent in exactly the right position to fertilize the eggs. It has always been recognized that there were problems with this theory. The sperm would have to pass through much faster than food normally does, and avoid being digested. Various ways were postulated to explain how this is done.


Another idea is that the sperm comes out of the gill covers of the female and are directed backward in the right general direction to fertilize the eggs. Reading forums, you can see that there are people who adamantly insist that one or other of the theories are correct. The supporters of both sides are experienced breeders who have carefully observed the spawning of Bronze Catfish. Personally, I think the second theory is more likely to be correct.

Raising the Fry
After hatching the babies will live on their yolk sac for 2 or 3 days. They will then eat infusoria and fine fry food including Microworms and other very small live food.


2017-12-17

SILVER SHARKS - Fresh Water Minnows

English: Bala sharks in a tank. Photographed w...
Bala sharks in a tank  (Photo credit: Wikipedia)
Although the name suggests otherwise, the Silver Shark is actually a minnow. This fish has many monikers including, Bala shark, tricolor shark, tri-color shark minnow, hangus, Malaysian shark, and silver Bala. Last, but certainly not least there is also the scientific binomial name, Balantiocheilus melanopterus.

Silver sharks are found in the fresh waters of South East Asia. Although they are bred in captivity by professional breeders, the vast majority of them are still caught in the wild. In fact, so many are caught that silver sharks are making their way onto the endangered species list.


They are very easy to identify in an aquarium. When they are healthy, they have a shiny silver body and jet black bands on the back edge of their fins. Their dorsal and tail fins are reminiscent of a shark; that is why they are called silver "sharks". When fed certain foods they may have an additional yellowish color between the silver body and black fin bands. Hence the name tri color shark.

When bought in the store they are usually between 1 and 2 inches long. With proper nutrition and comfortable surrounds, they should be nearly 10 inches long after a few years. If yours are not that long, don't forget that all fish are individuals and their genetics have a large part in determining how large they will grow. After all, not all humans are 6 feet tall. The silver shark's maximum length is said to be 14 inches. A fish that big will require quite a large aquarium.

Silver sharks do best when kept in a shoal of 5 or more silver sharks. If you keep them in smaller numbers they may be aggressive towards other members of the aquarium community. If you are lucky enough to have 5 or more silvers and they all grow to be 12 inches or more long your tank will have to be at least 125 gallons. And make sure that you have a lid securely fastened over the tank because they are jumpers.


Silver Sharks are relatively weak when it comes to disease resistance. They will become sick before most other members of the aquarium. So if your silver sharks are coming down with something make sure you pay a little more attention to the health of your fishes.


2017-12-16

ELODEA - An Excellent Oxygenator Plant For Your Pond

Elodea canadensis2 ies.jpg
"Elodea canadensis2 ies" by Frank Vincentz Licensed via Wikimedia Commons.
Elodea is a genus of aquatic plant known to be a fine oxygenator for ponds and aquariums. Elodea in the Greek literally means marshy. Also known as waterweeds (American or Canadian) or water weed, Elodea is native to North America and is found in ponds and slow streams. The only place it is not found is in the extreme northern parts of the continent. It has also been introduced to many other parts of the world.

Some species of Elodea, introduced in England in 1841, clogged up canals and waterways. It is considered a problem plant in many areas of the world. However, in the United States, the Elodea is considered an excellent plant for use in ponds and aquariums.

Elodea is a slender plant that grows from 4 inches to 3 feet depending on the depth of the water. The American waterweed (Elodea Canadensis) lives entirely underwater except for delicate white pistillate flowers that bloom at the surface and float on the surface of the water. Staminate flowers rise to the surface and release their pollen. The fruit of the Elodea ripens below the surface. Elodea produces heavy buds in the Fall that fall off and drop to the bottom and then begin to grow in the Spring; relying little on seed production.

Geese, ducks, and swans like to eat Elodea plants so don't be surprised if growing it in your pond attracts some of these visitors. Elodea is also an excellent plant for the protection of fish fry. Gold fish will lay their eggs so that they attach to the stalks and the fry use the stalks for cover.


Elodea can tolerate a wide range of temperatures, PH levels, and growth mediums. Before introducing new plants, it might be wise to keep them in quarantine or run the plants through a plant dip/bath to rid them of unwanted snails or algae. If you want a hardy, low-maintenance oxygenator plant for your pond, the Elodea is an excellent choice.


2017-12-15

PHOTOGRAPHING FISH: 5 Tips For Frustrated Beginners

post photosafari
Photo  by Céline Martinet 
Photographing pets 
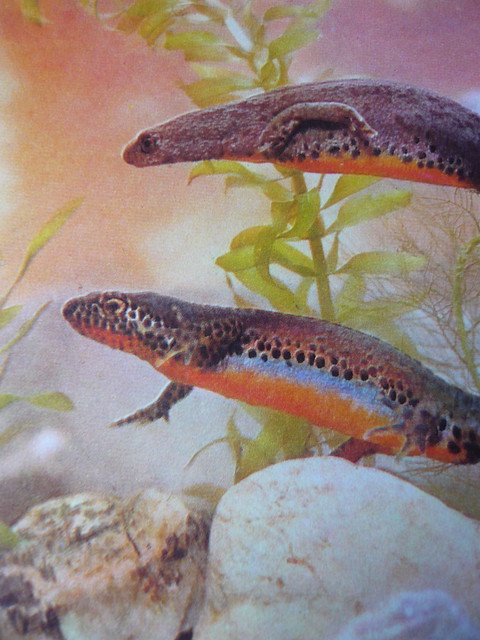
can often be a difficult proposition. Add water, glass reflections and the low lighting of an aquarium environment, and you've got the recipe for one extremely difficult photo shoot.

But it doesn't have to be that hard. Armed with the following tips, you can get great photos of your fish in just about any situation.

1: Get a tripod.

Tripods are usually used for non-moving subjects. But they can be immensely helpful when photographing fish, even ones that are constantly moving. Low light levels lead to slow shutter speeds. So anything you can do to stabilize the camera will be of tremendous help. The best way to photograph moving fish with your camera on a tripod is to loosen the levers on the tripod so you can move the camera freely left, right, up and down but the camera will remain in position if left alone.

2: Get your fish acquainted with the camera.

Now that you have a tripod (since you faithfully followed the first tip), set it up in front of your aquarium with the camera mounted on the tripod. Now leave it. For as long as possible... several days would be ideal. The purpose of this exercise is to get the fish used to see the "thing" you're constantly moving around, pointing it at them and making noises. When they're comfortable with the sight of the camera, they'll be more relaxed and less prone to dart around the tank or hide.

3: Use a digital camera.

Digital cameras allow us to "just take the picture" without worrying about whether we're wasting the film and processing money on a shot that won't be good. When you can focus on getting the best shot possible, no matter how many tries it takes, you're on the right track to get the shot you want.

4: Turn off the lights in the room.

Ambient light causes reflections on the tank glass that may ruin a perfectly good fish photograph. Eliminate all sources of ambient light that you can, and be very aware of any reflections as you shoot. If there are some reflections you can't get rid of, try putting your body between the light source and the glass to shield the tank from the light.

5: Clean the glass, cut the pumps.

Turning off the aquarium pumps before you shoot is an excellent way to clean up your shots of particles and bubbles in the water column. and if you happen to have a planted freshwater tank or reef aquarium, this will also prevent the plants or corals from swaying in your picture, turning into a blurry mess.


Cleaning the glass is probably the most overlooked step to aquarium photography, and quite possible is responsible for more ruined photos than any other issue. Remember, just because you don't see it now, doesn't mean you won't see it in the picture. Amazing how that happens. So clean the glass well, every time, before you pick up the camera.

6: A Bonus!

Have fun. Aquarium photography can become an interesting and challenging hobby all its own. Have fun with it, experiment freely, and be sure to share your pictures online!