2018-03-10

NANO REEF Tank Setup

10G Nano Reef
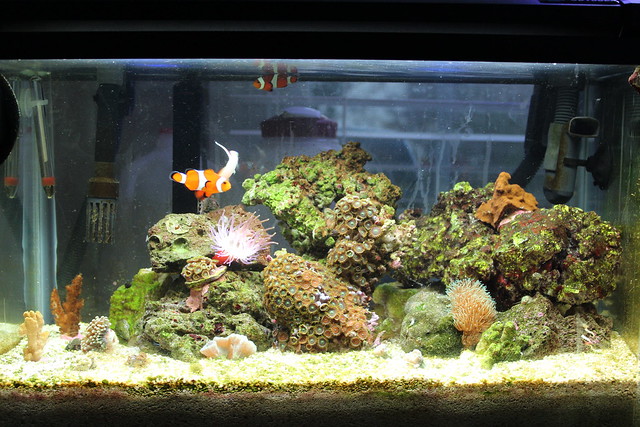
Photo by aquarist.me 
If you are into reef tanks and your curiosity drove you to know more about Nano Reef tanks, read on.

Let me start from the bare basics. What exactly is a nano reef tank? A nano reef is nothing but a reef tank of fewer than 20 gallons. Now, this is not a sacrosanct rule of law like Newton’s law on gravity but I strongly adhere to this definition as 20 gallons is the threshold where popularly accepted formulas for reef tanks or ‘small’ reef tanks begin to lose ground, calling for new conventions.

Next, a pretty obvious question which you may ask is why would you want a nano reef tank? Pretty obvious answer: It is generally a low-cost affair. You can easily manage a decent nano tank with less than $200. Apart from cost they are easy to maintain, you can fit them anywhere, are extremely portable (that means if you are bored of watching it lying on your home desk, take it to your office desk without any hassles!). 

And it is not something for just novices. They can offer new challenges to experienced reef keepers minus the cost and time constraints. I say challenging because there is very little room for error when it comes to the nano tank. Whether it is maintaining water quality or temperature stability or oxygen depletion, one has to be extremely careful in maintaining a nano reef tank.

Lighting a Nano reef is something of a complex issue. There are people who have kept Nano reefs with 3-7 watts per gallon of light. Some have used 30 watts. It boils down to the fact that you can have a successful coral tank using the rule of thumb, 3-7 watts per gallon, but your tank will be healthier if you provide larger quantities of light.

A nano reef will require your attention towards heating and cooling aspects too. This is because in a nano reef tank stable temperature control is very important. Unlike large tanks temperature change in nano reefs can be quite large and frequent. For the heating purpose, a normal heater would suffice. But cooling is a difficult problem. A common solution is to keep the tank in an air-conditioned room. Some people use evaporative cooling with fans, but this is probably not the best idea as there are chances that amount of evaporation it causes can produce wide specific gravity shifts in a nano tank which would not be appreciated by the tank's inhabitants.

Due to the small surface area, a nano reef tank will require adequate water circulation more than any other form of a reef tank. A simple and effective solution is to use an open-ended bubbler. Larger is the size of your tank more bubblers you may need.

There is no doubt that a sump would greatly aid in the temperature and nutrient buffering capabilities of a nano, but it seldom used. The main reason for this is that being small in size, using a sump adds to the complexity and takes up space, a big constraint in a nano.

Now here comes the best part of the nano reefs. The water quality maintenance or change is ridiculously simple! Being small, the water quantity is low. So changing the water every two weeks is a painless task. A regular water change will also obviate the need for a skimmer.


Now decide on for what live rock to choose and what quantity. Again here is a nano advantage. Since the size is small you wont be required lot of rock so you can go for the best quality live rock without causing a dent in your bank account.

And finally the choice for corals : You could go for both stony corals or soft corals. Virtually every soft coral is eligible for a nano reef tank. But when it comes to stony ones few points need to be cosnsidered. You should go for small colonies of stony corals, preferablly 12". You can pick any among Acropora, Bubble coral, Favites, Torch Coral or Elegance coral.

For a 5 gallon nano, you should add another about 3 lbs of live rock, plus at least another 3 lbs of live sand.

So go all out and play! Its not about the size, remember all good things come in small packages.


2018-03-08

SPARKLING GOURAMI - Trichopsis pumila

Trichopsis pumila.jpg
"Trichopsis pumila" by Zikamoi - Photo: Wikipedia (C)
Sparkling Gourami (T. pumila)
Growing to approximately 1 1/2 inches in length, the sparkling, or pygmy, gourami (T. pumila) is the smallest member of the genus. Males are slightly larger than females. T. pumila is a living jewel with numerous iridescent blue spots along the upper body and in the unpaired fins. The unpaired fins can be edged with a red or whitish band. The body pattern consists of a horizontal mid-body bar that runs from the snout through the eye to the base of the caudal fin. This bar is broken in some specimens and can even be formed of a series of slashes. Males generally have more colour in the fins and longer dorsal fins.

T. pumila is broadly distributed throughout Vietnam, Thailand, Laos, Cambodia, Peninsular Malaysia, and the Indonesian islands of Borneo and Sumatra, with most aquarium specimens originating in Thailand. It is found primarily in slow-moving or stagnant water, almost invariably under the cover of floating plants or among marginal plants. In many cases, the water in these habitats is extremely poor in dissolved oxygen as well as mineral content. Peat bogs are a common home to this species. The pH can be as low as 3.0.

In the aquarium, the sparkling gourami is highly adaptable and will do well at pH levels in excess of 8.0, which is truly surprising for a fish that inhabits blackwater in the wild.

Spawning is more likely when the pH is below 7.0 and the temperature is 80° to 82°. The male builds a very small bubblenest among floating vegetation and then entices a ripe female to spawn below the nest in the typical anabantoid spawning embrace. After depositing the eggs in the nest, the male guards them and the resulting fry until they reach the free-swimming stage. Fry are exceptionally tiny and must be fed infusorians as a first food. It may take 10 to 14 days before they are large enough to feed on newly hatched brine shrimp nauplii or microworms. Despite being the smallest member of the genus, T. pumila produces the highest sound pressure when making the croaking sounds.

Three-Stripe Gourami (T. schalleri)
T. schalleri is named in honour of renowned collector Dietrich Schaller, who has introduced a number of anabantoids and other species to the aquarium hobby. This species is commonly known as the three stripe or lace-fin gourami, owing either to the three dark horizontal stripes visible on the body or the extensive pattern of blue spots and red edges on the unpaired fins.

T. schalleri is very similar in appearance to T. pumila but grows larger. There has long been some doubt about whether these two were, in fact, separate species, but recent work indicates strongly that they are in fact different species. Among other things, the sounds they produce are different and are consistent within each species. Despite its smaller size, T. pumila produces louder tones than any other species in the genus.

T. schalleri grows up to 2 1/2 inches in length. Males have slightly longer fins and can sport an extension from the lanceolate caudal fin and extensions from the anal fin. This species is found in the Mekong drainage and can be found in Cambodia, Laos, Vietnam, and Thailand, with almost all aquarium specimens being collected in Thailand.


Typical of the genus, T. schalleri is found primarily in swampy or marshy areas as well as rice paddies. Spawning and rearing the fry is the same as for T. vittata.

Add a Trichopsis to Your Aquarium
The next time you're looking for a colourful fish to be the centrepiece of a small planted aquarium or just want to keep a fish you can hear for a change, consider one of the croaking members of the genus Trichopsis. These little jewels will reward your selection with colour, interesting behaviour, and a bit more noise than you typically expect from your aquatic charges. To find out more, you can check out Sparkling Gourami.

    by Jon Cole 
    Hi, I'm a traveller, fishes fanatic, reader and teacher. I hope to share my fishes experiences with you through my articles. If you like my articles, do share with your friends. I thank you for that first.
    ArticleSource: GoArticles


2018-03-07

5 Steps To a Perfect KOI POND

wr-new ponds 005
Koi Pond - Photo by pondelegance 
Step 1- Setting Up The Perfect Environment

You perfect Koi pond 
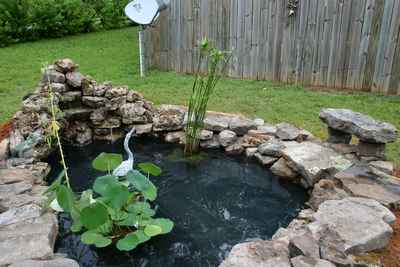
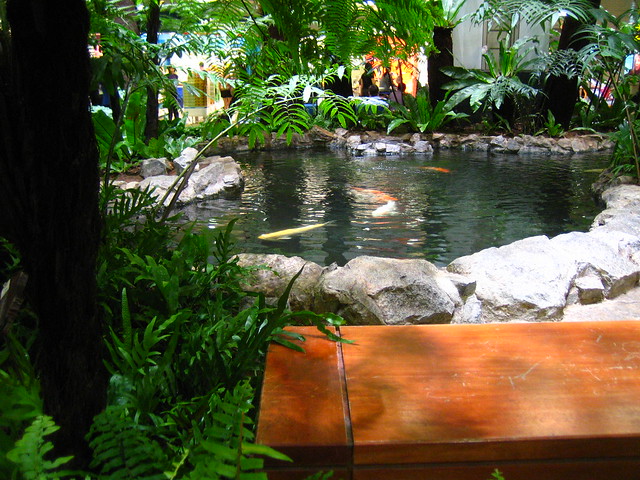
starts with the actual pond itself. You have to create a pond that will not only be pleasing to the eye but will also adequately sustain Koi. Proper placement, size, and pond type are essential when building your pond.

When it comes to pond size, the bigger is always better. Koi have a habit of growing rather fast, so you have to consider pond size at the same time you are considering how many Koi you are going to put it in.

Unless you have a large amount of knowledge in outdoor landscaping, fish keeping, and construction, it may be a good idea to leave the pond building to a professional. While some people think that building the pond yourself with save you money, this could not be further from the case. If your pond is not built properly the first time, you will end up spending a large amount of money on fixing the problems that come up. Not only that, if your pond is not properly setup, you may not even be able to keep fish alive.

Remember when you hire a professional, it is their job to give you what you want. They can give their knowledge when it comes to decision making, but ultimately, they will do whatever you want them too. Because of this, you cannot blame them if your pond fails to do to location, size, or other factors. However, beware of extremely cheap quotes as they may cut corners that could potentially cause you problems later. While quotes will come in different, there should not be a very dramatic difference between them.

Step 2- Learning about Koi Keeping

Knowledge is power when it comes to Koi keeping. It is important to learn as much as you possibly can about the hobby before jumping in with both feet.

It is important to learn the information yourself rather than relying on other sources. People such as your product dealer and pond builder will have limited knowledge, but should not be trusted for a reliable source, as they are selling products and may be biased. Plus, once you are at home with your Koi, your product dealer or pond builder may not be available to help you in the event of a problem.

Step 3- Picking Out Koi

Once you have created the perfect environment, you will need to start looking into buying your fish. It is important to remember never to purchase too many Koi because they will grow rather large, and they breed almost yearly. Overpopulating your Koi pond will cause serious problems in the future.

Step 4- Preventing Common Koi Pond Problems

You can prevent certain types of Koi pond problems by following simple prevention steps.

Always quarantine new fish before introducing them to your current Koi population. Koi can have certain illnesses and viruses, such as KHV or Koi Herpes Virus, with little or no showing symptoms. By quarantining, you will greatly reduce the risk of exposing your population to potentially deadly situations.

Do water tests at least on a weekly basis. This will allow you to notice discrepancies in the test results long before your pond starts showing symptoms of stress. This will potentially save not only your pond but your fish as well.


Step 5- Feeding You Koi

Finally, feeding you Koi can be one of the most pleasing parts of having a perfect Koi pond.

You should check with your local pet store or Koi dealer when it comes to the amount and types of food that you should be feeding your fish. Feeding patterns change with season and temperature.

Koi can be fed treats such as fruit, veggies, bread, and store-bought treats.

Koi can literally be trained to eat directly from your hand. This takes time and patience, but will ultimately provide entertainment to you and your visitors.


2018-03-06

Pet JELLYFISH Facts: Upside Down Jellyfish (Cassiopeia Xamachana)

Cassiopeia xamachana - Wikipedia
Upside down jellyfish (Cassiopeia xamachana) is another member of the order Rhizostomae. The species name, xamachana, means Jamaican although their natural habitat is in no way exclusive to Jamaican waters. Populations exist throughout the Gulf of Mexico and Caribbean as well as along the coats of Florida. They are also present halfway across the globe in the Pacific Ocean. Although not native to these waters, upside down jellyfish were introduced to the Hawaiian Islands during World War II most probably from jellyfish polyps attaching themselves to the underbellies of warships coming back from the Philippines.

This species is prevalent in shallow, warm tropical waters such as mangrove swamps. They are often called mangrove jellyfish because they are frequently found in large aggregations in these swampy regions. Unlike many species of jellyfish, upside down jellies are completely marine. None have been found in brackish or fresh waters.

These jellies spend their lives completely differently than most jellyfish. Jellyfish typically spend much of their time drifting freely on the ocean's currents. Upside down jellyfish are free swimming until they reach about 2 cm. Then their bell inverts and they sink to the bottom of the ocean floor. From there they will spend the majority of their adult life upside down on the muddy substrate with their tentacles pointed up to capture the ever-present zooplankton from water columns.

Much like blue jellies, upside down jellyfish have a symbiotic relationship with zooxanthellae. This is the same symbiosis that occurs with many jellyfish and coral species. In addition to providing essential nutrients, these golden algae also produce oxygen to help support respiratory metabolic functions the jellyfish needs to survive in oxygen-poor environments. This is of particular importance to upside down jellyfish because they spend the vast majority of their life nestled in muddy substrate and must rely on their food to come to them. Because of their specialized eating habits, upside down jellyfish are usually found in nutrient-rich waters with high concentrations of decaying matter to support the zooplankton teaming within these swampy, saltwater environments.

Upside down jellies have flat, saucer-shaped bells. Their umbrellas are typically greenish grey or blue in colour. They have a central depression or exumbrella in their bell. The exumbrella acts as a suction device to help them stay anchored to the ocean floor. Rather than a single mouth opening, they have 4 elaborately branched oral arms. These arms have a frilly, lace-like appearance similar to many green, leafy vegetables. They are often referred to as cabbage-head jellyfish because of these appendages. It is believed that this species a filter feeder and also relies on some form of absorption of dissolved nutrients directly from the water to supplement its nutritional needs.

Upside down jellyfish do not directly inject their prey like most jellyfish do. Their nematocysts (stinging cells) are controlled by the cnidocil. This is the equivalent to a mechanically or chemically triggered grenade launcher. The stinging cells launched from the cnidocil produce a cnidoblast that will stun or paralyze prey in the immediate vicinity. The jellyfish then begin ingesting their prey with their primary mouth openings. Once the prey is reduced to food fragments, these nutrient particles are passed on to secondary mouths for further digestion.


The jellyfish's cnidoblasts also function as a self-defence mechanism. If abruptly disturbed, large groups of these jellies will launch themselves upward from the ocean floor and release their nematocysts. This massive venom release into the water is usually sufficient to ward off potential predators. The toxic compound is generally inconsequential to human beings. It may result in an itchy or tingling sensation of the skin or a rash on individuals more sensitive to the venom.

Upside down jellyfish can reach up to 14 inches in diameter in the wild. In captivity, a maximum growth potential of 8 inches is more realistic. Depending on their size in captivity, upside down jellyfish can be fed zooplankton, or small invertebrates and fish. In order to allow their symbiotic algae to properly photosynthesize, a lighting system conducive to a marine reef tank is highly recommended. These jellies have a higher temperature tolerance than most scyphozoan medusa. Medusae or adult jellyfish can be found year round. However, the optimum temperature for these adult jellies is between 75-78 F. This simulates the height of the adult season. Upside down jellyfish typically strobilate during summer or early fall. Whereas most scyphozoans strobilate during the winter months.

    By Stephen J Broy

    Technological advancements in the aquarium industry continually redefine the concept of "home aquarium owner." Just twenty years ago not even the biggest public aquarium was capable of keeping jellyfish alive in captivity. Now they make desktop Jellyfish Fish Tank Aquariums. And why would you want a jellyfish tank? Perhaps you should check out what the translucent bodies of Pet Moon Jellyfish look like under LED lighting. Pet Jellyfish give a whole new meaning to the term exotic pets.

    Article Source: EzineArticles


2018-03-05

Koi Ponds During The Spring

Huge ass Koi
Koi Fish Pool - Photo by jeremyfoo 
Making sure your pond is ready for the coming seasons should not take you more than a weekend to complete, and will ensure that you have a successful water garden for the remainder of the year.

Your Koi pond will literally come to life at the first of springtime. The Living organisms in your pond have spent the previous winter in a proverbial hibernation, and are ready to come to life at the first signs of warm weather. This is the perfect time to begin maintenance on your pond before the fish, plants, and other pond life come back to life from their winter slumber. As the days begin to get warmer, your pond will start drastically changing. If you are not careful, you may miss this much-needed opportunity to perform maintenance. Generally, watch for temperatures around 50 degrees, as this is the perfect time.

The maintenance needed on your pond will largely depend on what happened during the previous winter. If the previous winter was hard, chances are you will need to perform more changes so it may be a good idea to start as soon as you start noticing the weather changes. However, some spring maintenance will have to be completed every year, no matter how harsh or how mild the previous winter was.

Water Quality

You may notice that the water in your pond is extremely clear when the seasons are changing from Winter to Spring. Do not let this fool you, as there are several factors that will actually cause problems once Summer comes if you do not remedy these issues ahead of time.

During the Fall and Winter months, the organic material such as leaves and plant material may have found its way into your pond. While the water seems clear at the time, the organic material placed a large number of nutrients into your pond, which will cause a surge of algae growth once spring arrives. If algae were not enough, a large amount of organic material in your pond will start to decompose and will reduce the oxygen content in your water.

Since your water is perfectly clear, it is the perfect time to clear all of this unwanted debris and slit from your pond. This can be completed a number of ways.

1) Hire a pond professional from your local dealer or pet store. They will have the equipment needed to vacuum the majority of the debris and slit out of your pond. While this is a more costly option, you will have the assurance that the majority of the problem causing material will be removed from your pond.  

2) If hiring a professional is not an option, you may want to consider using a fine mesh net to scoop up as much debris as possible. The only issue is most nets will only stir up the slit in your pond, rather than remove it.


Once you have removed unwanted debris, you must then test your water. Winter seems to cause the pH levels to change. At the start of Spring, your pH level should be an 8. This can be achieved by topping your pond off with treated tap water which is buffered to be slightly alkaline by your local water company.

Maintaining your Fish

Springtime is a very weak time for your fish, because they have not eaten for months, and have maybe lived on a low level of energy. This causes your Koi to be more susceptible to attacks from organisms such as bacteria, parasites, viruses, and fungi. This makes Spring the opportune time to take all preventative measures possible. Adding a large spectrum of treatment solutions will greatly reduce the amount of disease-causing pests and material. Once the temperature warms up, another dose of this treatment will ensure that your Koi will be well protected while they redevelop their immune systems. Once temperatures warm up, your Koi immune systems will be effective enough to protect themselves from a disease.  


2018-03-04

Keeping a Pet Hermit Crab Happy

Australian Land Hermit Crab (Coenobita variabilis) - Photo: Flickr 
Pets have made a difference in many people’s lives for a long time. The most popular pets have been pets such as cats, dogs, and fish. Within the past few years or so, Land hermit crabs have become a very popular pet in the small pet market. Many people have realized that they make fascinating pets. If a person decides to make the choice of a land hermit crab for a pet, there are several ways to make sure the crab is comfortable, healthy and happy. These ways include making sure the hermit crab has proper food and water, the proper environment and proper hygiene and care.

One of the first ways to keep a pet hermit crab healthy is the proper hermit crab food. Many people have many different ideas about the healthiest diet for a hermit crab. There are three popular diets for land hermit crabs. One diet choice is simply to feed your land hermit crab basically the same things you eat. Numerous people feel that feeding hermit crabs small bits of cooked meats, raw veggies, and fresh fruit is the best way to nourish your crab. This is, indeed, a healthy way to feed your crab because, in the wild, hermit crabs are scavengers. They are definitely not picky creatures. Other popular diet choices include fish flakes and crab food pellets or granules. These are also acceptable ways to nourish your crab. Whatever type of diet you choose for your pet, a treat every now and then is a great way to break up your hermit crab’s diet. Small pieces of fruit and veggies and the occasional piece of cooked meat are great ideas for treats.

Water should be clean, fresh, dechlorinated water. Dechlorinators are available but can become expensive over time. Bottled, filtered water is acceptable. A dish of salt water and a dish of fresh water is required to drink and soak in for your crab.

Another way to be able to keep your hermit crab healthy and happy is to make sure your crab has the proper environment in which to live. To make your hermit crab habitat, needed first is a container. A housing can be as basic as a 10-gallon aquarium or a reptile habitat. Make sure your crab habitat is roomy enough for toys and food and water dishes.  Your crabby also needs room to roam. If you wish to get more than one hermit crab, which is recommended because they are very social creatures, you must keep this in mind when thinking about space in your crab habitat.

Other environmental issues exist. The substrate is what goes in the bottom of the habitat. Sand, coconut fibre, or small crab gravel can be used. Humidity and temperature should be approximately 70% and 72°. This is important to keep their gills moist and to give them an environment to which they are adapted. Toys are very important to keep the crab happy. Things to climb on, hide under, and push around are great things to put in your pet’s habitat to increase the hermie’s enjoyment.


The third basic thing that is needed is proper care. Proper care of your crabby includes bathing it once a week in purified dechlorinated water, feeding according to the directions of the chosen diet, spritzing your crabby and its environment to keep constant humidity, and paying attention to your little friend.

These are the basics when it comes to keeping your hermie very healthy, happy, and comfortable. There will be more information needed and research that needs to be done to be a great caregiver, but this information will get started and on your way to being the proud owner of a terrific pet that can provide great entertainment and can be a rewarding experience. Hermit Crabs are great pets.


2018-03-03

What You Should Know About CONVICT CICHLID Fish Care

Convict-Cichlid-Male
Photo  by Marcel Sigg 
All people that are growing cichlids know that we are in front of an exciting hobby. It is perfect for beginners, especially if they want to raise convict cichlid fish. This is because it is quite easy to take care of them. You are not to have to deal with a lot of problems when breeding them. The zebra cichlid the common name stands out as highly attractive and this does bring in a lot of people wanting to raise them.

Convict cichlid fish are capable of adapting to different water conditions. An aquarium for them needs to include some rocks, artificial caves intended for breeding and some flat stones. Plants are not really needed because they are to be destroyed by this fish. In the event that you do want to add plants for design, you should use plants that are hardier like Amazonian sword plants or java fern.

These fish will accept quite a wide range of PH and temperature. One thing that is really important is that all has to be kept stable and no quick changes have to be made. The water PH level should be around 7 while the temperature is perfect if kept around twenty-five degrees Celsius. Convict cichlid fish stand out as an omnivore and are capable of eating almost anything that you buy. Aquarium plants can also be taken into their diet.


One really important fact is that a convict cichlid fish is really aggressive when placed in the same tank with other fish. When mating season appears this becomes highly true. We do recommend that you keep them in a separate tank when breeding season comes. All convict cichlids will be easy to breed. The parents are always guarding fry and eggs and are really protective parents.

The bottom line is that it will be easy to raise a convict cichlid fish. In the event that one beginner is looking for one fish that can be raised easily and looks very well there will be no real problems.