2018-11-28

Disposal of Aquatic PLANTS and ANIMALS

English: Duchesnea indica, invasive species, i...
Duchesnea indica, invasive species, in the "Wood of Citadelle"
(Photo credit: 
Wikipedia)
Too many times non-native plants and animals are released into the wild either unintentionally or because the aquarist can no longer care for them.

This poses a unique problem to many hobbyists…what exactly do I do with my aquatic plant/animal that I cannot care for? With the help of this wonderful thing that eats up most of my day (the internet, for you non-it people that actually work) I’ll try to cover some of the basics here…

Plants

Let’s say that John Q. Aquarist has an overabundance of a particular aquatic plant. “Whatever will I do with all of these plants?” John wonders. Well, there are a number of ways to safely dispose of these potentially invasive species, here are a few:

Burning: If allowed in your area, can be an excellent way of disposing of plants that have seeds.

Freezing or Drying: This will effectively destroy plants, but might allow seeds to survive. You can place them in a zipper-type plastic bag and throw them away after this.

Composting: Like freezing or drying, this will also do the job of destroying the plant, but seeds can potentially survive to be carried off by birds or animals that might ingest the seeds.

Animals

John Q. Aquarist got up this morning and discover that his tank contained a huge batch of baby platies. “Ruh roh, what I’m going to do now? My tank can’t support this many fish!” John laments. Don’t worry, John, there is a help!

Friends: If you have a friend that is into the wonderful world of fish keeping, perhaps he’d like some little guys. Use your head though: if he or she would like to have them, make sure you let your friend know the particulars about the species…it will just put your pal in the same position if he or she is not prepared.

LFS: If your LFS is like mine, they will take your unwanted pets…sometimes for a trade, sometimes not. Either way, it’s better than euthanizing or flushing. (Flushing is particularly cruel...a slow death is guaranteed by suffocation or poisoning)


Whatever you decide to do, never release them into the wild! Aquatic plants and animals could introduce diseases that the native population is not prepared for. At best, some species can out-compete the natives.

Some states have penalties for improper disposal of aquatic life. I hope this helps to answer some questions and prevent any unfortunate incidents.

If you have anything to add, by all means, do. In no way do I consider this definitive, so let’s see some other opinions!

(Remember, you can always contact your local Department of Natural Resources or Health Department for specific information for your area)

2018-11-27

Bagging and Transporting KOI

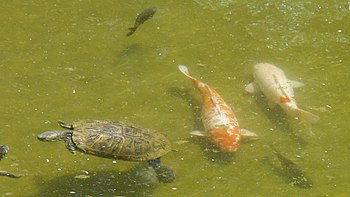
Red-eared slider turtle and Koi fish at pond i...
Red-eared slider turtle and Koi fish (Photo credit: Wikipedia)
Koi, like any other pet, will have medical issues throughout its life, especially since Koi have been knowing to have a lifespan of up to 30 years. You contact the vet because you Koi is showing signs of injury or illness, and unless you have a vet that does house calls, chances are the first thing they will say is “bring it in.”

Issues with your pond can arise, whether it is an emergency move because your pond is placed into harm's way by natural events or a planned move due to new construction. No amount of planning can ensure that you will not have to move your Koi for one reason or another.

With the problems that arose from recent events such a Hurricane Katrina and Hurricane Rita and everyday events such as common illnesses, it is imperative that you have a plan of action when it comes to your pride and joys. No matter if it is an emergency or not, knowing how to properly bag and transport your Koi could mean the difference between life and death.

Equipment Needed

First, it is always a good idea to have all the equipment needed to transport your Koi on hand. If you are having an emergency with your Koi, you may or may not have time to make a trip to your local pet store to gather what you need. The equipment needed to bag and transport Koi is small and easily stored when not in use.

Bags- You must have the proper bags on hand to transport Koi. Do not attempt to transport your Koi in the trash or regular plastic bags, as they are not designed for this, and may cause damage to your Koi. Unless you remembered to keep the bags you brought your koi home in originally, you will have to make a trip to your local pet store. Make sure to get bags sizable enough to hold your Koi.

Rubber Bands- You will need quite a few rubber bands for each bag you buy. Make sure that your rubber bands are good quality, as you do not want the pressure from the water to pop the rubber band in the middle of the transport.

Net- You will need to have a net sizeable enough to compete with your Koi. You will never need the net to pull the Koi out of the water with, but you will need it to lead and direct your Koi into the place you want them. Nets can potentially damage your Koi, especially as the larger they get.

Paint Bucket- A paint bucket is a better option for catching your Koi, as they cannot hurt your Koi like a net can. Make sure that your bucket is sizable enough to hold your Koi.

Bagging your Koi

The process of catching and bagging your Koi is actually pretty simple as long you have the proper equipment available. If your pond is large, you may want to consider enlisting the help of your friends when bagging your Koi.


Use the net to guide the Koi into the Paint Bucket. Once the Koi is in the paint bucket you can remove any excess water, and begin bagging the Koi.

Make sure that you check the bags for leaks. Once you are sure that the bag is secure, place the bag over the Koi from head to tail. Make sure there is enough water in the bag to completely cover the gills. Leave plenty of air room so that the bag is not too heavy to carry. Slip the rubber bands around the end of the bag and continue to double it until the bag is secure.

Place the bags horizontally in your transport container. Make sure that you do not bend the fish when lifting it. Secure the bag so that it will not move with bumps and turns, and cover the fish so that as little heat and sunlight can enter as possible.


2018-11-26

The DISCUS FISH Diet

English: Red Turquise Discus Fish فارسی: ماهی ...
(Photo credit: Wikipedia)
Feeding Discus Fish can be challenging at times. While they have no specific nutritional preferences and can be fed on just about any high protein fish food, they're often extremely cautious to new foods and will go without eating for up to 4 weeks before accepting a new food.

This is obviously not very healthy, particularly not for younger fish, so the wise thing to do is to ask what they are being fed at the time of purchase, and then take things from there.

When trying to change their food, do not use the starving technique to get them to eat the new food, but rather feed them with a mix of the foods, and gradually change from one to the other.

The best thing to do is to, over time, get them used to a varied diet, rather than just sticking to one kind of food. So what kinds of food should be part of their diet?

Fish Flakes

Just about any will do - but it's better to stick to a top brand one for quality control purposes. Discus Fish prefer to be fed at midwater to bottom levels so you may have to soak and squeeze the flake food first.

Bloodworm

Definitely a firm favorite with the discus fish, which can and should be used once daily. Make sure you use frozen irradiated worms because there's less chance of them having parasites in them.

English: Brine shrimp (artemia salina).
Brine shrimp (Artemia salina). (Photo credit: Wikipedia)
Brine Shrimp

Discus Fish love frozen brine shrimp, and they contain important vitamins and minerals that will enhance the color of the discus fish, and keep them in a good overall shape. Defrost and rinse them before feeding.

Granules and Freeze Dried

On this one, you're spoilt for choice, and they are all good for Discus Fish food. It's a good idea, however, to stick to the top makes (like Tetra Bits) to ensure good quality. Some of the cheaper brands can cause bloating and constipation, because they absorb water, and expand when the fish have eaten them.

Foods to avoid

Beef heart or pork heart has traditionally been fed to Discus Fish to promote good coloration and fast growth - but there are issues with feeding your discus a diet high in mammalian protein. Also, live foods should be avoided as the health risks involved in using them far outweigh the benefits.

Sticking to the menu above is well better - it's simply not worth taking the risk.

General feeding tips

As a rule of thumb - it's better to feed too little than too much - if you're not sure how much food to give. Discus Fish are slow eaters that will graze and pick at their food and should be allowed to do so at their own pace. 5-10 minutes is usually enough for them to eat well. If they are less than that you may want to feed a bit more - but be careful not to overfeed them - because this will affect the water conditions in a negative way.


2018-11-25

Creating a Conducive Environment to Help CORYDORAS Catfish to Breed

Corydoras Habrosus
Corydoras Habrosus (Photo credit: Wikipedia)
A lot of fish-keepers love to keep Corydoras catfish in their tanks because of several reasons. They are friendly with other species of fish have, they are peace-loving, they are small in size and they are the best cleaners of the aquarium.

Once you start keeping them, you are obviously interested in breeding them. Sometimes, without any effort on your part, you will find their eggs at the bottom of the tank. This may be due to the fact that they are happy with the conditions of the tank and they are confident that their young ones will also be happy in the same environment.

Well, in such a situation, you obviously do not take any special efforts. However, if such a situation does not occur, you may be interested in breeding them. Here is some advice for you to do it successfully.

The first step in breeding any fish is to create a separate tank. That is very convenient and it increases your chances of success. The tank may not be big but it should be wide so that it will provide good space to Corydoras catfish for swimming at the bottom. It will also provide an opportunity for the new ones to get more oxygen. As these fish do not normally use the upper portion of the tank, you can arrange for a tank of about 10 gallons of capacity available at a reasonable price in the market. 

You should provide sand or small gravel at the bottom of the tank. You should also provide some hiding place for the fish to make them happy. You can also add some plants having big leaves because the females may like to lay eggs on such leaves. You can provide a small filter for cleaning the water. Do not go for a big filter because there is a risk of small fry being sucked into it.
You have to keep Corydoras catfish in groups for successful breeding. They should be kept in the proportion of two females for one male.

You should remember an important thing while breeding Corydoras catfish - they will not breed if they are not happy about the environment. So to make them confident about their surroundings, you should provide a few hiding places, keep the water clean and free of toxic contents, keep the levels of nitrites and ammonia within the limits and if the tank is too small, you should change the water frequently.

To help Corydoras catfish breeding, you should also provide them with plenty of food. They usually like bloodworms, so you should treat them with such food. Remember, the rainy season is considered ideal for the breeding of Corydoras catfish.

After all these preparations, you will find them getting ready for breeding. The female will get fatter, which shows that she is full of eggs and the males will be around her most of the time. At this time, you may change the water to make them comfortable.

The females will store eggs under their fins. They will try to go near the genitals of the mail and will start sucking the sperm. It will pass through her body and will be then sprayed on the eggs.


Once this is done, the females will approach plants or other hiding places where they will lay eggs. At this time, you should remove either the eggs or the parents from the tank because the parents do not take care of the eggs or the fry. The eggs are sticky and you can transfer them without much effort. However, it is better to avoid exposing eggs to open air. The eggs should be kept in a slow flow of water to avoid fungal growth on them. A simple way to do it is to put an air stone at the bottom of the tank.

The color of eggs will be beige and you may also find a spot on them as they approach the time of hatching. The eggs which are not fertile will look white in color. Soon, the new ones will come out.
They will require special food which should preferably be in liquid form. It is available in pet shops. 

After a couple of days, you can provide them with small brine shrimp for proper nutrition. With their growth, you can increase the quantity of food gradually. It is extremely important to look after the conditions of water at this time because the small ones will be very delicate and will not be able to tolerate abnormal conditions.

After about two weeks, you may transfer them to a bigger tank or to the main tank in which you are keeping other species of fish.


2018-11-24

The BOSTON AQUARIUM SOCIETY - New England Aquarium Boston

The New England Aquarium, located on the Harbo...
The New England Aquarium, located on the Harborwalk, Boston MA (Photo credit: Wikipedia)
Boston is the capital of Massachusetts, U.S.A. and the largest city in New England. It has been described as “a state of mind almost entirely surrounded by water”, this is because almost all parts of Boston is water.

A society has also risen from Boston. A specific society that was founded in 1916 is called Boston Aquarium Society. It is the longest running and the second oldest aquarium club in the entire planet today.

The Boston Aquarium Society is focused more on the interests and knowledge that can be taken from the activities made especially for the members of the society. If you want to be a member of the Boston Aquarium Society, you need to stay in this particular society for a long period of time. The society will encourage you to stay longer so you will go out full of knowledge and new ideas. The society has many activities like plant and fish growing projects which allow placing an aquarium in most of the classrooms. If you are an aquarium hobbyist, you will truly enjoy the affordable activities of the Boston Aquarium Society.

A Red Lionfish (Pterois volitans) at the New E...
A Red Lionfish (Pterois volitans) at the New England Aquarium.
(Photo credit: 
Wikipedia)
In Boston Aquarium Society, every member is involved in all the activities and all aspect in growing marine plants and breeding fishes in many ponds. Some members are even members of many associations related to the preservation of marine life. Some members also write about the Boston Aquarium Society in national magazines and newspapers. Aside from being a part of some organizations, Boston Aquarium Society is also a member of The Northeast Council of Aquarium Societies.
Boston Aquarium Society is also focused on giving advanced knowledge to all the members. The members are allowed to donate any type of fish breed, plants, time and knowledge to the society. The society uses these particular donations for the students that visit the place for the educational tour. This will encourage more kids to make some of the activities in the Boston Aquarium Society as a hobby.

They also build programs, seminar and workshops with highly respected and well-educated speaker that can teach you plenty of new ways to improve your knowledge about fishes and other marine creatures. They are more than willing to share their knowledge by giving the members the knowledge they need to learn.

So if you want to improve your knowledge about fishes and other aquatic creatures, be a member of the Boston Aquarium Society. The information you need is just within your reach.


2018-11-23

Getting a PLANT For Your GOLDFISH TANK

Deutsch: Anubias barteri und Anubias heterophy...
Anubias barteri and Anubias heterophylla (Photo credit: Wikipedia)
Buying a plant for your goldfish aquarium is a great idea. Your aquarium will look more beautiful and it makes a good meal for the fish. The bad side is that you have to keep buying plants for your tank if your goldfish keep eating it.

There are two types of plants: real and artificial. Any plant can be part of fully submerged. It is your decision on what type of plant you want. It is best not to place it near the filter intake.

If you are a beginner it is recommended to buy an artificial plant. These will last longer than real ones, give your goldfish shelter and most importantly look good. The silk artificial plants could be better than the plastic ones. A goldfish like the Black Moor or Bubble Eye can get their sensitive parts scratched by the plant. So the most important lesson is to decide what kind of plant you want to have in your tank depending on what varieties of goldfish you have.

The real plants are the ones your goldfish eat. If you decide to add a real plant to your aquarium then you should add one at the time so that the ecosystem can adapt to the changes easily. They will also cause changes in Ph levels and if you add too much the Nitrogen Cycle will be affected and you may experience fluctuations in oxygen levels.

Best tips to help you keep algae under control

1. Keep nitrates low by doing 20-30% water changes every week
2. Keep the tank out of direct sunlight
3. Do not leave the UV light more than 8 hours per day
4. Keep phosphates low by removing uneaten food from the tank
5. Buy some snails from the pet shop

You can go now and buy any plant you like from the pet shop with keeping in mind what you have learned. Do not do mistakes or the plant in your aquarium can cause problems for your goldfish.

    Florin Iusan is a goldfish enthusiast. He has been keeping and caring for goldfish for over 16 years and he loves doing it. To learn more about getting a Goldfish Plant and how to set up your aquarium visit http://goldfish2care4.com.
    Article Directory: EzineArticles


2018-11-22

FILTRATION: Necessary process to poison free aquarium water

Filtration system in a typical aquarium: (1) i...
Filtration system in a typical aquarium: (1) intake, (2) mechanical filtration, (3) chemical filtration, (4) biological filtration medium, (5) outflow to tank (Photo credit: Wikipedia)

In order to have poison free aquarium water, the filtration process is very important to the aquarist. Since most aquarists are aware of the fact that their aquarium water gradually accumulates potentially harmful substances, which eventually poison their fishes. In order to prevent this from happening there is a need for filtration, therefore, for our purpose, I would define filtration as the removal of unwanted substances from water.

Most aquarist uses three types:
Biological,
mechanical,
chemical amongst which the biological is the most important.

Biological filtration is also referred to as undergravel filtration because the major equipment used (a flat plate of perforated plastic) is placed under the gravel bed hence it is invisible. Unless you are properly equipped, you can’t see the process happening and cannot measure its effect. Yet this process is the major difference between success and failure, and the aquarist who does not take the time to understand its workings is doomed to watch an endless procession of dying fishes passing through his tank.

Biological filtration is solely the work of bacteria attached to the surfaces of the gravel, the grave and the under gravel filter together constitute the filter bed. Bacteria normally reach the filter bed through the food you give the fishes.

The waste product of the fishes, the air, and even by your hands as you are working in the tank.