2018-12-01

Setting Up A TERRARIUM for Your REPTILE

Photo Wikipedia
A terrarium is similar to an aquarium except that it isn't full of water and fish.  It's a tank made of glass or plastic with a wire mesh lid.  The mesh allows air to come in and keeps the reptile from escaping.

Reptiles are cold-blooded, unable to make their own body heat, which is why it is hard for them to move around if the temperature isn't right in their environment. Reptiles lay eggs to hatch their babies.  Unlike human babies, which are dependent at birth, reptile babies are born ready to care for themselves.

A successful terrarium is set up with the proper heat source for temperature perfection.  A thermostat will ensure the correct temperature at all times.  Reptiles need a basking lamp to sunbathe and a light tube for ultraviolet rays.

It sounds expensive and complicated to a beginner, and it very well may be depending on what your idea of expensive is.  But once your terrarium is set up, the biggest hurdle is being able to afford the proper food and bedding.  The expense of bedding is reduced if you buy two pieces of indoor/outdoor carpeting to allow one to be cleaned while you use the other for your pet.

There are several ways to set up your terrarium, depending on the needs of your reptile.  The desert terrarium will need coverage over the inside bottom floor.  Most people choose sand or gravel for the desert appeal.  Plants will add a hiding place for your reptile and helps increase the natural look and feel of their environment.

You must provide water even in a desert setting for three reasons---drinking, bathing, and moisture.  Even in the desert a certain amount of water is necessary.  It should be kept clean and accessible at all times for your pet's comfort and to ward off disease from unclean water.  Sometimes a lizard or snake reptile will prefer a tropical forest terrarium setting.  You'll have to make sure you regulate the day and night temperatures.  Investing in some sort of timer will make this less of a chore and safer for your pet.

The tropical forest is kept damp at all times.  Provide a layer of wood chips and maybe some moss to hold the moisture.  Keep some sort of trees to allow your reptiles to climb among the branches.

Turtles and some snakes require a habitat that is part land and part water.  You must purchase a heater designed to control the water temperature.  Adding rocks allows the reptile access out of the water when needed.  The rocks should be free of sharp edges to avoid injury to the reptile as it navigates through its home.  Place a fluorescent light over the dry areas to allow sunbathing.

The last habitat choice is called a savanna.  You can consider it a medium ground between the dry desert setting and the very humid tropical setting.  It's also cooler than either and stays only slightly damp.  Shady areas should be included for the pet's comfort.  Plastic plants discourage the reptile from eating the scenery.  Coarse gravel is allowed in the savanna setting.


2018-11-30

Feeding Brains - BRAIN CORALS

English: Open Brain Coral, Metallic Green Spec...
Open Brain Coral, Metallic Green Species: Trachyphyllia geoffroyi
(Photo credit: 
Wikipedia)
A customer who was considering purchasing an open brain coral (Trachyphyllia geoffroyi) from us called me up to ask me if he would need to feed this animal. He said that he had seen a lot of contradictory information on the Internet about whether or not open brain corals need targeted supplemental feedings or not. Given our focus on brain corals this week, I am going to answer his question here so that everyone knows what it is we recommend.

First off, I thanked this customer for doing his research before acquiring the animal. I can't emphasize how important it is that you research every animal thoroughly before you purchase it in order to make sure the animal is compatible with your set-up and that you are prepared to meet the animal's needs in terms of husbandry. Regarding the feeding of open brain corals, you will see a variety of opinions ranging from "never feed an open brain coral directly" to "feed it daily." We definitely recommend target feeding any brain coral. Whether you have one of the many Favia species or a colorful Trachophyllia, brain corals, in general, do much better in reef tanks with supplemental feedings.
But where is the mouth? "Wait a second," you say. "Brains have mouths?"

While that sounds like a campy science fiction movie from the 50s, the take-home point is valid. Brain corals do have mouths, and they do need to be fed. Most brain corals are nocturnal feeders, and they change their appearance dramatically at night by partially deflating their tissue and extending feeding tentacles located around each individual mouth. Some brain corals have many mouths while others are sold as pieces of a larger colony (e.g. Lobophyllia) and usually have only one mouth.

Regardless of the number of mouths, you want to target feed these animals two or three times per week. Try small pieces of meaty marine flesh, brine shrimp, baby brine shrimp, Cyclopeeze, or our own Blue Zoo Mix. You can soak the food in water with a vitamin supplement like Selcon and then use a turkey baster or the Kent Sea Squirt to target feed each open brain coral. After the coral gets acclimated to aquarium life, it will almost always extend its tentacles whenever these foods are present-even during the day.

With the proper husbandry, open brain corals will grow quickly and remain healthy in most systems.

    Published 1 July 2008. Blue Zoo Aquatics
    Blue Zoo Aquatics was formed in 2001 as a custom aquarium design, manufacture, installation and maintenance company which provided its services in and around Los Angeles, California. The company founders and key personnel had either a background in marine biology or had spent their entire career in the saltwater aquarium industry.
    Customers who bought a custom aquarium were also frequently asking us to provide livestock and aquarium supplies, so we created bluezooaquatics.com to showcase our entire product offering and make it available to everyone.
    Today, Blue Zoo Aquatics has evolved into the complete source for all of your aquarium needs. Although we can still design and build you a beautiful custom aquarium, we are also proud to offer one of the largest selections of livestock on the web as well as a wide variety of quality aquarium supplies.
    Our business has expanded, but Blue Zoo is still owned and operated by the same team of expert aquarists that have dedicated their lives to helping people have fun and succeed with saltwater aquariums. - http://www.bluezooaquatics.com
    Article Source: EzineArticles


2018-11-29

The Unique Species of GOURAMI FISH

Golden Giant Gourami
Golden Giant Gourami (Photo credit: Wikipedia)
Gourami is a tropical fish living in fresh water. It comes from a family called 'Labyrinth'. The main characteristic of this family is the fish have an organ for breathing. This organ is connected to their gill chamber.

This feature of Labyrinth family is very unique and it helps them to take oxygen from the air if the water is not having a sufficient level of oxygen. So fish in this family can breathe even by coming out of the water for some time.

Gourami fish originated from Asia and Africa are there are about 15 different species of Gourami which are available for the fish keepers. The original amongst them is called 'Goramy' and it originated from Indonesia and China.

This 'Goramy' fish is also called 'Giant Gourami' because it grows very big and its length can exceed two feet! If you want to keep this 'Goramys' in your aquarium, you must have a very large area or you should create a big pond outside your house to keep them. They can live up to 25 years or even longer so once you keep them; they will be with you for a long time.

Then there is another species called the kissing Gourami. They are somehow opposed to the giant 'Goramy' because they grow up to 8 inches. Another species called 'talking Gourami' is even smaller. They can grow only up to 2 inches. They are called 'Talking Gourami' because they make a sound when they come to the surface to take oxygen from the air.

There is one more type available to fish keepers, which is called the Moonlight Gourami. They are silvery blue in color and their fins are like a thread.

Most of the Gourami species require similar conditions for their living. They are comfortable in the range of 75-80° F. They love to live in slightly acidic water with a pH level of around 6.0 to 6.5
You should have a lot of plants in the aquarium when you keep Gourami fish. The plants should be sturdy because the size of the fish is big. You can use fine or medium substrate at the bottom of the tank.


Gouramis should be provided with a well-balanced nutrition. They will eat whatever is offered to them and they can survive with any type of food but you should plan their food well to keep them healthy. Keeping dry food as a base, you can feed them with live food occasionally. You should also provide fresh vegetables and all sorts of worms. In the absence of appropriate food, they will not look healthy and they will not live for a long time.

All the species of Gourami fish are peaceful in nature and they can get along with other members of the community quite well. You should keep them with other fish of the same size so that they will not be any fights. You can also keep same species of Gourami in the aquarium but as they are bigger in size, they will not be able to live comfortably with the growth in their numbers.

One more important characteristic about Gourami is - if they are of the same species, they may have territorial ambitions. So they will fight with each other for their territories. If you have sufficient plants in your aquarium, these plants can act both as a barrier and a boundary which can keep the fish contended with one area.

    By Chintamani Abhyankar
    Chintamani Abhyankar is a goldfish enthusiast and has been raising and breeding goldfish for many years. He is an expert on their care and an advocate for raising healthy goldfish the natural way.
    Article Source: EzineArticles


2018-11-28

Disposal of Aquatic PLANTS and ANIMALS

English: Duchesnea indica, invasive species, i...
Duchesnea indica, invasive species, in the "Wood of Citadelle"
(Photo credit: 
Wikipedia)
Too many times non-native plants and animals are released into the wild either unintentionally or because the aquarist can no longer care for them.

This poses a unique problem to many hobbyists…what exactly do I do with my aquatic plant/animal that I cannot care for? With the help of this wonderful thing that eats up most of my day (the internet, for you non-it people that actually work) I’ll try to cover some of the basics here…

Plants

Let’s say that John Q. Aquarist has an overabundance of a particular aquatic plant. “Whatever will I do with all of these plants?” John wonders. Well, there are a number of ways to safely dispose of these potentially invasive species, here are a few:

Burning: If allowed in your area, can be an excellent way of disposing of plants that have seeds.

Freezing or Drying: This will effectively destroy plants, but might allow seeds to survive. You can place them in a zipper-type plastic bag and throw them away after this.

Composting: Like freezing or drying, this will also do the job of destroying the plant, but seeds can potentially survive to be carried off by birds or animals that might ingest the seeds.

Animals

John Q. Aquarist got up this morning and discover that his tank contained a huge batch of baby platies. “Ruh roh, what I’m going to do now? My tank can’t support this many fish!” John laments. Don’t worry, John, there is a help!

Friends: If you have a friend that is into the wonderful world of fish keeping, perhaps he’d like some little guys. Use your head though: if he or she would like to have them, make sure you let your friend know the particulars about the species…it will just put your pal in the same position if he or she is not prepared.

LFS: If your LFS is like mine, they will take your unwanted pets…sometimes for a trade, sometimes not. Either way, it’s better than euthanizing or flushing. (Flushing is particularly cruel...a slow death is guaranteed by suffocation or poisoning)


Whatever you decide to do, never release them into the wild! Aquatic plants and animals could introduce diseases that the native population is not prepared for. At best, some species can out-compete the natives.

Some states have penalties for improper disposal of aquatic life. I hope this helps to answer some questions and prevent any unfortunate incidents.

If you have anything to add, by all means, do. In no way do I consider this definitive, so let’s see some other opinions!

(Remember, you can always contact your local Department of Natural Resources or Health Department for specific information for your area)


2018-11-27

Bagging and Transporting KOI

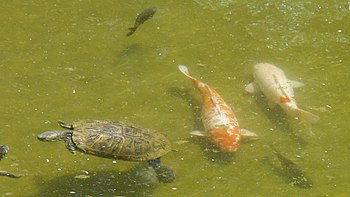
Red-eared slider turtle and Koi fish at pond i...
Red-eared slider turtle and Koi fish (Photo credit: Wikipedia)
Koi, like any other pet, will have medical issues throughout its life, especially since Koi have been knowing to have a lifespan of up to 30 years. You contact the vet because you Koi is showing signs of injury or illness, and unless you have a vet that does house calls, chances are the first thing they will say is “bring it in.”

Issues with your pond can arise, whether it is an emergency move because your pond is placed into harm's way by natural events or a planned move due to new construction. No amount of planning can ensure that you will not have to move your Koi for one reason or another.

With the problems that arose from recent events such a Hurricane Katrina and Hurricane Rita and everyday events such as common illnesses, it is imperative that you have a plan of action when it comes to your pride and joys. No matter if it is an emergency or not, knowing how to properly bag and transport your Koi could mean the difference between life and death.

Equipment Needed

First, it is always a good idea to have all the equipment needed to transport your Koi on hand. If you are having an emergency with your Koi, you may or may not have time to make a trip to your local pet store to gather what you need. The equipment needed to bag and transport Koi is small and easily stored when not in use.

Bags- You must have the proper bags on hand to transport Koi. Do not attempt to transport your Koi in the trash or regular plastic bags, as they are not designed for this, and may cause damage to your Koi. Unless you remembered to keep the bags you brought your koi home in originally, you will have to make a trip to your local pet store. Make sure to get bags sizable enough to hold your Koi.

Rubber Bands- You will need quite a few rubber bands for each bag you buy. Make sure that your rubber bands are good quality, as you do not want the pressure from the water to pop the rubber band in the middle of the transport.

Net- You will need to have a net sizeable enough to compete with your Koi. You will never need the net to pull the Koi out of the water with, but you will need it to lead and direct your Koi into the place you want them. Nets can potentially damage your Koi, especially as the larger they get.

Paint Bucket- A paint bucket is a better option for catching your Koi, as they cannot hurt your Koi like a net can. Make sure that your bucket is sizable enough to hold your Koi.

Bagging your Koi

The process of catching and bagging your Koi is actually pretty simple as long you have the proper equipment available. If your pond is large, you may want to consider enlisting the help of your friends when bagging your Koi.


Use the net to guide the Koi into the Paint Bucket. Once the Koi is in the paint bucket you can remove any excess water, and begin bagging the Koi.

Make sure that you check the bags for leaks. Once you are sure that the bag is secure, place the bag over the Koi from head to tail. Make sure there is enough water in the bag to completely cover the gills. Leave plenty of air room so that the bag is not too heavy to carry. Slip the rubber bands around the end of the bag and continue to double it until the bag is secure.

Place the bags horizontally in your transport container. Make sure that you do not bend the fish when lifting it. Secure the bag so that it will not move with bumps and turns, and cover the fish so that as little heat and sunlight can enter as possible.


2018-11-26

The DISCUS FISH Diet

English: Red Turquise Discus Fish فارسی: ماهی ...
(Photo credit: Wikipedia)
Feeding Discus Fish can be challenging at times. While they have no specific nutritional preferences and can be fed on just about any high protein fish food, they're often extremely cautious to new foods and will go without eating for up to 4 weeks before accepting a new food.

This is obviously not very healthy, particularly not for younger fish, so the wise thing to do is to ask what they are being fed at the time of purchase, and then take things from there.

When trying to change their food, do not use the starving technique to get them to eat the new food, but rather feed them with a mix of the foods, and gradually change from one to the other.

The best thing to do is to, over time, get them used to a varied diet, rather than just sticking to one kind of food. So what kinds of food should be part of their diet?

Fish Flakes

Just about any will do - but it's better to stick to a top brand one for quality control purposes. Discus Fish prefer to be fed at midwater to bottom levels so you may have to soak and squeeze the flake food first.

Bloodworm

Definitely a firm favorite with the discus fish, which can and should be used once daily. Make sure you use frozen irradiated worms because there's less chance of them having parasites in them.

English: Brine shrimp (artemia salina).
Brine shrimp (Artemia salina). (Photo credit: Wikipedia)
Brine Shrimp

Discus Fish love frozen brine shrimp, and they contain important vitamins and minerals that will enhance the color of the discus fish, and keep them in a good overall shape. Defrost and rinse them before feeding.

Granules and Freeze Dried

On this one, you're spoilt for choice, and they are all good for Discus Fish food. It's a good idea, however, to stick to the top makes (like Tetra Bits) to ensure good quality. Some of the cheaper brands can cause bloating and constipation, because they absorb water, and expand when the fish have eaten them.

Foods to avoid

Beef heart or pork heart has traditionally been fed to Discus Fish to promote good coloration and fast growth - but there are issues with feeding your discus a diet high in mammalian protein. Also, live foods should be avoided as the health risks involved in using them far outweigh the benefits.

Sticking to the menu above is well better - it's simply not worth taking the risk.

General feeding tips

As a rule of thumb - it's better to feed too little than too much - if you're not sure how much food to give. Discus Fish are slow eaters that will graze and pick at their food and should be allowed to do so at their own pace. 5-10 minutes is usually enough for them to eat well. If they are less than that you may want to feed a bit more - but be careful not to overfeed them - because this will affect the water conditions in a negative way.


2018-11-25

Creating a Conducive Environment to Help CORYDORAS Catfish to Breed

Corydoras Habrosus
Corydoras Habrosus (Photo credit: Wikipedia)
A lot of fish-keepers love to keep Corydoras catfish in their tanks because of several reasons. They are friendly with other species of fish have, they are peace-loving, they are small in size and they are the best cleaners of the aquarium.

Once you start keeping them, you are obviously interested in breeding them. Sometimes, without any effort on your part, you will find their eggs at the bottom of the tank. This may be due to the fact that they are happy with the conditions of the tank and they are confident that their young ones will also be happy in the same environment.

Well, in such a situation, you obviously do not take any special efforts. However, if such a situation does not occur, you may be interested in breeding them. Here is some advice for you to do it successfully.

The first step in breeding any fish is to create a separate tank. That is very convenient and it increases your chances of success. The tank may not be big but it should be wide so that it will provide good space to Corydoras catfish for swimming at the bottom. It will also provide an opportunity for the new ones to get more oxygen. As these fish do not normally use the upper portion of the tank, you can arrange for a tank of about 10 gallons of capacity available at a reasonable price in the market. 

You should provide sand or small gravel at the bottom of the tank. You should also provide some hiding place for the fish to make them happy. You can also add some plants having big leaves because the females may like to lay eggs on such leaves. You can provide a small filter for cleaning the water. Do not go for a big filter because there is a risk of small fry being sucked into it.
You have to keep Corydoras catfish in groups for successful breeding. They should be kept in the proportion of two females for one male.

You should remember an important thing while breeding Corydoras catfish - they will not breed if they are not happy about the environment. So to make them confident about their surroundings, you should provide a few hiding places, keep the water clean and free of toxic contents, keep the levels of nitrites and ammonia within the limits and if the tank is too small, you should change the water frequently.

To help Corydoras catfish breeding, you should also provide them with plenty of food. They usually like bloodworms, so you should treat them with such food. Remember, the rainy season is considered ideal for the breeding of Corydoras catfish.

After all these preparations, you will find them getting ready for breeding. The female will get fatter, which shows that she is full of eggs and the males will be around her most of the time. At this time, you may change the water to make them comfortable.

The females will store eggs under their fins. They will try to go near the genitals of the mail and will start sucking the sperm. It will pass through her body and will be then sprayed on the eggs.


Once this is done, the females will approach plants or other hiding places where they will lay eggs. At this time, you should remove either the eggs or the parents from the tank because the parents do not take care of the eggs or the fry. The eggs are sticky and you can transfer them without much effort. However, it is better to avoid exposing eggs to open air. The eggs should be kept in a slow flow of water to avoid fungal growth on them. A simple way to do it is to put an air stone at the bottom of the tank.

The color of eggs will be beige and you may also find a spot on them as they approach the time of hatching. The eggs which are not fertile will look white in color. Soon, the new ones will come out.
They will require special food which should preferably be in liquid form. It is available in pet shops. 

After a couple of days, you can provide them with small brine shrimp for proper nutrition. With their growth, you can increase the quantity of food gradually. It is extremely important to look after the conditions of water at this time because the small ones will be very delicate and will not be able to tolerate abnormal conditions.

After about two weeks, you may transfer them to a bigger tank or to the main tank in which you are keeping other species of fish.